
Thursday, 18 September 2025
UE5 Niagara Notes
The Basics
Niagara has four core components:
- Systems
- a system is a container that holds your effect. You can apply settings on the system that affect everything inside it.
- Has a timeline panel in the system editor that shows emitters and can also manage it.
- Emitters
- where particles are generated
- controls how particles are born, what happens when they age, and how they look and behave
- organized in a stack, inside of which is several groups, inside which you can put modules to do tasks

- These groups are:
- Emitter Spawn:
- what happens when an emitter is first created
- defines initial setups
- Emitter Update:
- defines modules that occur every frame on the CPU
- used to define spawning of particles when you want them to continue spawning on every frame
- Particle Spawn:
- Called once per particle when it is first born
- defines initialization of the particles, such as birth location, color, size, etc
- Particle Update:
- called per particle on each frame
- use to define anything that needs to change frame-by frame as the particles age (ex: if particles color/size change over time, or if particles are affected by some type of force).
- Event Handler:
- create generate events in one or more emitters
- then create Listening events in other emitters to trigger a behavior in a reaction to a generated event
- Render:
- define the display of particles
- use mesh renderer if you want to define a 3D model as the basis of your particles
- use a sprite renderer if you want particles as 2D sprites
- many other renderers to choose from
- These are color coded so that anything green is related to the emitter, and the red is anything related to the particles
- Modules
- building blocks of effects
- add modules to groups to make a stack
- processed sequentially from top to bottom

- Think of it as a container for doing some math, you pass in some data, then write that data out at the end of the module
 |
| Data flow of a module |
- Modules are built using HLSL or using the node editor.
 |
| HLSL logic flow |
- double click any module to look at the graph inside
- scripts start with getting an input and at the end writing that output back out so modules further down the stack can use it
- Parameters
- four types of parameters:
- Primitive: numeric data of varying precision and channel widths
- Enum: fixed set of named values
- Struct: combined set of primitive and enum types
- Data Interfaces: defines functions that provide data from external data sources
- add custom parameter module and then you can add new parameters to it.
Niagara Asset Browser Window

- Content Area
- Categories
- ToolBar (with the filter and Search bar)
- Details
You can add your own tags to these assets inside the content browser. These tags will show up in the categories tab. Explained more in detail on this page.
The VFX Workflow
- Create a system to hold and adjust the properties of your emitters
- Create emitters inside your system.
- Create Modules inside your emitters
- each module, emitter, system you create uses resources. To conserve resources, try to see if you can accomplish what you want with the things you've already created.
Resources
Notes on Specific parts of the Niagara System
Particle Spawn
Initialize Particle
Lifetime mode
You can set this to Random or Direct Set. With random you can set a minimum and maxium range to determine the lifetime of each particle. So some particles will die at the minimum value and some will die at the maximum value. With Direct set you can set a static value that all particles will die at. You can also select other sources, such as a Random Range Float value for Direct set as well (why you would do this I'm not sure since this makes it act like Random, but you could perhaps use other sources?)
Position Mode
Determines where your emitter spawns in the scene. By default it is at Simulation Position, so wherever your Niagara system actor is in the scene. The emitter spawns at that point. You can also set the offset as well.
If you choose direct set, then the particle system will ignore where it Niagara system actor is in the scene and spawn at the specified coordinate.
Particle Update
Here you can apply forces during the particles habit.
Drag
Particles slow down as they progress through their lifetime.
Curl Noise Force
Applies random noise force to the particles. Lower Frequency means the bigger the overall pattern the particles will fall to. Higher frequency will cause add smaller random forces to the particles.
Keep the Noise Quality/cost low because usually you won't see much of a difference between the low and high quality.
Point Attraction Force
Used to attract the particles to one specific point. If you have a low drag amount, the particles might bounce past the point and then get sucked back into it, making it look like a wobble ball of particles.
Vortex Force
Causes the particles to move in a spiral shape.
Point Force
Opposite from the Point Attraction Force module, this pushes particles away from a point. Mess with the Force Falloff Distance parameter combined with a point attraction force module to have the particles coalesce around an orb after the initial burst.
Wind Force
You can choose the direction the wind is facing and have the particles drift in that direction.
Houdini Workshop - Weeks 1-4
These are all of my notes from the first two Houdini Workshop days. I will continue uploading my notes as the workshop continues. These weeks continued to iterate over the island project.
One of the things discussed in the workshop is the idea of levels of noise. If you want something to be realistic in VFX, you need 3 levels of noise to make it believable. Big, medium, and then small, with the amplitude of the noise getting smaller as you go through each level.
Voxels were also discussed, you can think of them as 3D Pixels.
Starting out
First we need a curve node to draw the outline of the island. The curve node is a similar tool to Photoshop's pen tool. Once the curve is complete, we need to change the normals, as they are currently facing down away from us. Make a reverse node to show the Normals right side up. If we don't do this step it wouldn't render correctly. Finally, add a polyExtrude node to give it some depth.

Making Volcanos
We're starting to make a rough outline of our island. Now we want to add in mountains and volcanos using cylinders. Create a cylinder node. and adjust the top radius so the bottom radius is larger. Then use a transform node to adjust the position and size. Duplicate this with how many volcanos/mountains you want.

 |
| Change the first input box for radius to change the top radius |

Once you've finished making enough mountains, you'll need to combine them all, including your island shape into a Merge node.
 |
| Should look like this for now |
Heightfield Node

Now drop in a heightfield node, make it large like 4,000 by 4,000. Heightfields are useful in making realistic terrains. Using a heightfield projection node we can use the geometry we just made to 'shrink wrap the heightfield's volume around it. The heightfield uses voxels instead of polygons, so it'll appear smoother.

We have the heightfield set up, and we can use different nodes Houdini already has dedicated to manipulate heightfields to get a realistic looking Terrain. However, we first want to create a mask so the noise doesn't affect the water around the island.
Heightfield Mask by Geometry
You need a Heightfield mask by geometry node. First connect the heightfield project node to the first input, then connect the merge node you have with all the volcanos and poly extrude. You shouldn't have to change anything in the parameters. In the viewport you should see your island show up red. Anything in red is what will be affected. Everything outside the red will be masked out.
We'll want to adjust the mask so it fades off as it goes into the water. Add a mask shrink node and change the radius to around 50. Then add a heightfield mask blur node and change the radius to around 100.

The mask is now finished and we can now move onto adding noise to the terrain.

The mask is now finished and we can now move onto adding noise to the terrain.
Adding Noise
We can consider the base island shape and the cylinders to be our first level of noise. They're for blocking out the overall shape. Now we'll start on our second level of noise with a Height Field Noise Node.

Insert the heightfield project node into the first input of the heightfield noise node, with the second input coming from the mask we just made. Change the parameters to:
- Noise Type: Worley Cellular F2-F1
- Amplitude: 200
- Element size: 810 (this is the scale of the noise)
- Turn off "center noise: (noise is actually 4 dimensions of numbers, center noise means the noise starts in the center of the scene, aka the origin)
Additional Resources
https://www.youtube.com/watch?v=Oe0_C14lYgU
Saturday, 26 July 2025
Wednesday, 16 July 2025
Common Art Sprint #5 Delivery
Responsible for:
- Updating Rig with newest model
- adding more joints to the gunbelt

Wednesday, 2 July 2025
Common Art Sprint #4 Delivery
Responsible for:
- updating the jinroh model with the newest model
- updating gun model with new uvs
- adding ik controls onto the ammo gunbelt to allow for additional control for the animators and to animate it draped over the arm
- added twist joints for the arms
- added additional controls for the arm braces, kneepads, backpack, and new gun holster


Wednesday, 18 June 2025
Common Art Sprint #3 Delivery
Responsible for:
- General bug fixes and updates to the rig
- adding more controls to the gun, specifically for the ammo belt
- implemented dynamic spring interpolation for the gun belt inside a unreal control rig
- researched into dynamic joint chains in maya for animators to simulate with and have more control over it

Wednesday, 4 June 2025
Common Art Sprint #2 Delivery
Responsible for:
- Rig for the character and gun:
- updated gun model
- Both arms and legs have fk ik controls and switches
- Feet have reverse foot setup.
- Spine has a hybrid of fk and ik
- Helmet hose has an ik setup constrained to both the chest and helmet.
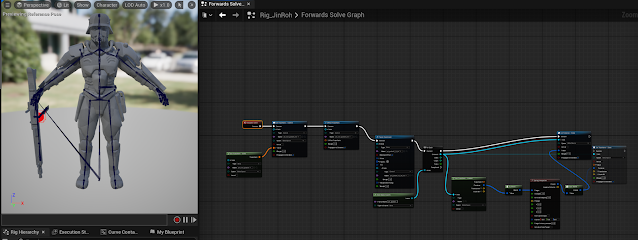
- Gun is paired to the right hand and can switch to both ik and fk when the character does
 |
 |
Wednesday, 21 May 2025
Common Art Sprint #1 Delivery
Responsible for:
- Skeleton for Character
- Assisted in editing layout reel to include timecode, names, and storyboards


Monday, 19 May 2025
Python in UE5
TO start, go into the unreal plugins, look for python. Turn on Python Editor Script Plugin. Go into settings and look for python, make sure developer mode is turned on (you will have to restart unreal).


Go into your unreal project, inside intermediate>PythonStub, you'll find unreal.py file


Make a new python file named logger.py. Import the unreal file and right out a log statement. This will help so that visual studio will autofill the unreal functions.
import unreal
unreal.log("Tech Art Rocks!")
Save this file. Then go to your unreal project. At the bottom right you should see a place to write commands. You can change this to python instead.

You can also log warnings and errors.
unreal.log_warning('this is a warning')
unreal.log_error('this is error')
Press up on the keyboard while in the text box to go back to a previous command.


If you want to have scripts that automatically load on startup, go to project settings,


If you want to add more paths to the default PYTHON_PATH in your unreal project, you can also do that in the project settings using the 'additional paths' parameter.
This will need to restart unreal again to apply the settings.
Want to install other packages to your python like numpy? Go to this file location
C:\Program Files\Epic Games\UE_5.4\Engine\Binaries\ThirdParty\Python3\Win64
Open up a command prompt and change to this directory.

We're going to be using pip to install numpy

This should have installed numpy and you can use it to perform matrix multiplication.
In unreal python, you have UObjects and they've got properties you can get/set them. You can see the documentation here.
Here's a script that prints the name, path name, full name, and class type of selected objects in editor:
import unreal
#decorator
@unreal.uclass()
class EditorUtils(unreal.GlobalEditorUtilityBase):
pass
selectedAssets = EditorUtils().get_selected_assets()
for asset in selectedAssets:
unreal.log(asset.get_full_name())
unreal.log(asset.get_fname())
unreal.log(asset.get_path_name())
unreal.log(asset.get_class())
unreal.log(type(asset))
unreal.log('#####################')

A way of repurposing a class by taking an existing class out of context, and using it how you want it.
Say you wanted to make a blueprint with a python script. Unreal python has 'factorys' where you create assets. So if you want a blueprint, you need to make a BlueprintFactory.
Example script to make several blueprints depending on the parameters you give
import unreal
import sys
blueprintName = "AStreamingBlueprint" #name of the blueprint
blueprintPath = "/Game/MyClassBlueprints" #where we will put it
createdAssetsCount = int(sys.argv[1]) #gives us the first parameter the user will input
createdAssetName = str(sys.argv[2]) #gives us the second parameter the user will input
factory = unreal.BlueprintFactory() #factory to make blueprint
factory.set_editor_property("parent_class", unreal.GameMode) #changing the parent class
assetTools = unreal.AssetToolsHelpers.get_asset_tools()
for i in range(createdAssetsCount):
assetName = f'{createdAssetName}_{i:02}'
unreal.log(assetName)
myAsset = assetTools.create_asset(assetName, blueprintPath, None, factory) #creating the blueprint
unreal.EditorAssetLibrary.save_loaded_asset(myAsset) #will save your asset, it will not save automatically

Putting 'createAssetWithArgs.py 3 FUBAR' in the command will create 3 blueprints.


Wednesday, 14 May 2025
A Crash Intro to Color - Color Operations and Linear Lighting
Linear Color Vs Perspective color and Basic Color Operations
Color doesn't exist, it's only your head trying to make sense of the electromagnetic signals. Light is an electromagnetic wave. When it is around it bounces all over the place. Without light reality still exists.
The phenomenon of color happens inside of our eyes. Light bounces into our eyes as photons through our Cornea., some is absorbed in surface as heat, some of it reach the back of our eye and stimulate the nerves (retina) in the back of our eye. Colors are read through cones. Humans only have three color receptors in our retinas. With it we can see approximately 10 million Colors.
Light Breakdown
Because we have three different types of receptors:

You can see we have three waves here. The shortest wave corresponds with blue, so we don't see blue as well. We are most sensitive to green. (That's why night vision goggles are green, it picks up the most amount of information for us.
Types of Color:
- Additive
- Subtractive
- HSV/HSL
- YUV (Y- brightness, U- blues and greens, V- reds and yellows; used for transmitting signals for cathode-ray tube tvs in Europe) (also called PAL)

- YIQ (Y - brightness, I - blues and reds, Q- greens and magenta; used for transmitting signals for cathode-ray tube tvs in America)(also called NTSC)
- YCbCr (Y- brightness, Cb- blue and yellows, CR- greens/cyan and reds/magenta)(also known as MPEG/JPEG/HDMI)
We Describle Colors using color models. Abstract representations of colors as tuples of numbers:
- RGB is an additive color model as a tuple (r,g,b). projected as white light
- CMYK is subtractive and a tuple (c,m,y,k). colors are absorbed
24 Bit RGB means you have 8 bits per color = 256 shades. 24 = 8+8+8
Gamut is like the footprint a color model. Not all display devices are created equal

Photo Real Test
- Can an image be captured with real colors?
- Can a photo real image be rendered based on the input?
- Can the image display accurately on a device?
Emission vs Perceptual
Nominal Light Emission is Linear. It is additive color. Each bar is increasing in value at the exact same speed. This is what real light is.

Perceptual Light is Gamma (sRGB). This slows down the transition so we don't go to the bright whites as fast. It happens right before an image shows up on your display. These are false colors.

Gamma Color Space (sRGB)
All recording and display devices record and display in 'Gamma' color space. When you look at any display you are looking at a lie!

When performing operations on colors:
- Convert color to linear color space
- Perform operations on color
- Convert back to gamma (sRGB) color space
When writing out to Bitmap and not to materials:
all base color and diffuse -> sRGB
all others -> Linear

This is a MacBeth charts, each piece has a linear color associated with it. You can use it to calibrate and make sure the colors show up true.
Subscribe to:
Comments (Atom)
-
Tech Art Blueprints Demo Animation State Machines Part 1 Animation State Machines Part 2 Math for Tech Art Part 1 Math for Tech Art Part 2 ...
-
Quick and Fast Instructions Create your NURBS curve Put your Curve into an empty group (Ctrl + G). Make sure you freeze and delete history ...
-
Resources Stop Staring By Jason Osipa Art Of Rigging – Kiaran Ritchie Muscles of the Face You'll want to conform to the anatomy of ...

