Shadow Mapping in 4 steps
- Projection Texture Mapping
- Occlusion Depth Mapping
- Projection With Occlusion
- Shadow Mapping
Projection Texture Mapping
- We're making the light into a camera with a view frustum. The projector is defined by its frustrum. Treat the light as if it were a came
- We need to transform its X, Y coordinates into NDC (Normalized Device Coordinate Space)
- The range is [-1,1] but textures are mapped to range [0,1]
- Scaling Matrix u=0.5x +0.5, v = 0.5y+0.5
- taking [u,v,0,0] and applying the NDC 4x4 matrix
- We need the projective texture matrix
- Doing this will transform any object into a projection. (Must be done in the vertex shader)
- Then in the pixel Shader you'll have the ProjectedTextureCoordinate from the vertex shader. But it needs to be in NDC space. To do this, divide the ProjectedTextureCoordinate.xy by the w coordinate.
- Sometimes, you might get reverse projection, it'll appear to emit from either side of the frustrum of the light. You can fix this by verifying if the projected texture coordinate's w component is greater than or equal to zero (it is the z component, how far away it is from the light. We don't want to have a z component that is negative because that means it's behind the light.) Only project texture when: IN.ProjectedTextureCoordinate.w >= 0.0
Occlusion Depth Mapping/Projection With Occlusion
- Objects being occluded will still receive the same projected texture so we need a depth map generated to test for occlusion. All objects in the scene needs to be tested against depth map (this can be very expensive)
- These depth maps are rendered to Render Targets (buffers in space that store information in space for future uses, we did these last week). The closer an object is, the brighter the map. Black means it is the farthest away from the light. You usually calculate the depth map in the vertex shader because it's faster and better precision.
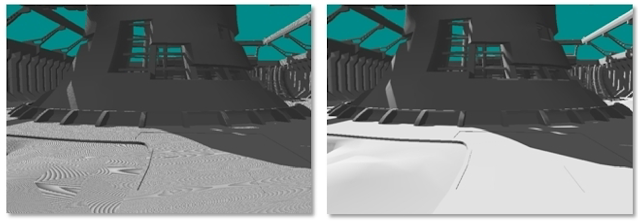
- Shadow Acne: Shadow maps can be limited in resolution and depths are quantized, you'll get aliasing issues. When actual depths are compared against sampled depths, results can vary (Precision Error).
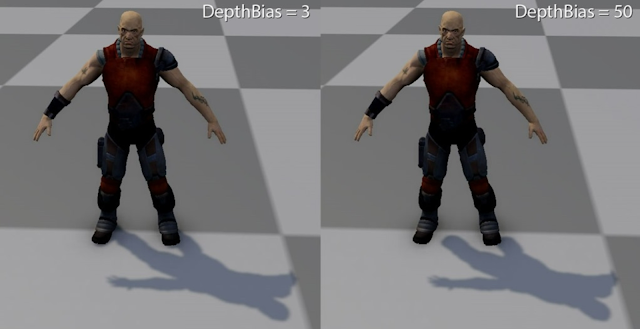
- You can set the depth bias to help with shadow acne, it subtracts from the depth map sample by a tiny amount to help with the precision error.
Shadow Mapping
Instead of using a projected texture for the shadow map, just use the depth map rendered from the light as the shadow map for the object.
Percentage Closer Filtering (PCF)
Soften the edges of the shadow, it averages multiple depth map values using a convolution filter.
This is fat and slow. Sampling depth map repeatedly is expensive and slow. Direct3D 11 provides an intrinsic PCF function: SampleCmp.
Peter Panning
An issue when the shadow appears disconnected. Happens when someone is trying to get rid of shadow acne and increases the depth bias too much. Typically occurs when Slope-Scaled Depth Biasing is not used.


No comments:
Post a Comment