We're going to be making the character hit the ground and fire a gun and then get back up. Here's a link to part two.
 |
| Notes from the Animation State Machine Lecture Powerpoint |
The Character Blueprint has movement, mesh, event graph, and then a pointer the Anim Blueprint. The Anim blueprint controls the articulated motions of the character skeletons. It has the AnimGraph, event graph, and the animation State Machine. The Animation State Machine (ASM) has blend spaces, states, conditions. An ASM has a node graph that connects what state the character should be in determined by conditions.
The Character Class is a child of the Pawn class, which is a child of the Actor class (think of the character class as just a fancy actor blueprint).
In real time rendering, you will be working with an ASM, they do it the same way in Unreal and Unity. EA has ANT (Animation Toolkit).
Setting up the Character BP
Ignore that I already have Quin in here, yours should start out with the yellow man.
Double click on BP_Quin to go into the blueprint editor. Inside here we have a capsule component (our collision field, using this to run into things can help us to interact with the environment), an arrow component (this tells us which direction we're facing), a SpringArm (this is for your over the head camera view, the camera follows the character) and the mesh containing our character.
Click on the mesh. We're going to change the skeletal Mesh. Choose 'SKM_Quin_Simple'. Make sure she is facing the x-axis (where the arrow is pointing).
Change the Mesh's location from -90 to -100. This is to ensure that the character is flat on the floor (we don't want our character floating).
Click on the Capsule Component, change the capsule Half Height to 90. We want the capsule to cover the majority of our character.
Click on Class settings at the top toolbar- it will show you everything inherited from the class. In class defaults it will show you a bunch of settings related to your character, physics, animation rig, skin weights, etc.
We're going to go into the event graph, which is already set up for you to listen for your inputs.
We want to know when the player is pressing the f button to know when we're firing or not. Go to the variables and create a new variable. Rename it to 'isFiring?'
 |
| Setting up the isFiring? variables to change depending on the F key |
We're done with character setup, now we're going to the animation blueprint.
Animation Blueprint
Back in the content drawer, in your Robo folder, right click>Animation>Animation Blueprint. You need to keep the parent class AnimInstance. For the target skeleton we want the 'SK_Mannequin'
Name the Animation Blueprint 'ABP_Robo'. An Animation blueprint is always on, meaning you can always interact with it. It's real time.Go to the event graph for this blueprint. It's very similar to the blueprint graphs you've seen before, but the AnimGraph is a bit different. This will have all of our animation composites and montages (we're not doing montages for the moment).
You have to tell the character blueprint and the animation blueprint to talk with each other. Go back to the character blueprint, either select bp_quin or the mesh (it will update for both so it doesn't matter), in the animation tab in details window, set Animation Mode to 'use animation blueprint'. Change Anim Class to 'ABP_Robo' (the anim bp we just made)
 |
| They append an '_C' next to it; unsure of why but just happens |
Our character isn't doing anything yet because we haven't put any animations yet, but they are connected now and will update once we start.
In the event graph for the Animation Blueprint.
When you hit compile, the white line between the two should turn red and it looks like it's sending information to the is valid. This means it is working and our animation is updating (although we have nothing moving yet).
In the content drawer in our Robo folder, right click > animation> blendspace (there used to be several types, but now its just combined into one blend space). Choose the same skeleton we chose before. Name the Blendspace 'BS_IDLE_JOG_SPRINT'. These will be our Blendspaces between our locomotion.
 |
| Inside the Blendspace we just made |
 |
| Asset Details Window |
Under Asset Details window, under Horizontal Axis, change the name to 'BSSpeed'. Notice now the bottom graph, the axis changed to BSSPeed, Now change the maximum axis to 500, and change the grid dimensions to 5.
 |
| Our graph located at the bottom of the screen |
Double click on the state machine to dive into it.
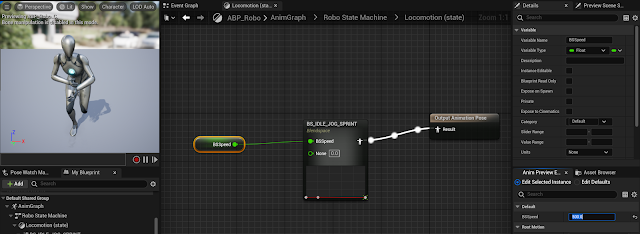
In here, drag the output from entry, let go, and then create a new state. Name it Locomotion. Double click on it to dive inside. Inside here create a node, look for BS_Idle_job_sprint (our blendspace we just made), connect the pose to output animation pose. Right click on BSSpeed and promote it to a variable. Compiling this will show Quin moving. You can change the BSSpeed to can see the different animations.
Set the BSSpeed back to zero and go back to Robo State Machine.


No comments:
Post a Comment