
When looking for references for lights, look at movies do not look at games. Lighting artists use movies to reference lighting, and then from there have to optimize it again. If you look at game lighting you're looking at a watered down version of what they were referencing.
Settings to make sure that Lumen is working
When you first make a project, make sure that you select Raytracing to be on.
Project settings

Project > Description > Under Targeted RHIs > Default RHI > DirectX12 is selected


Engine > Go to rendering > Global Illumination> dynamic global illumination method > Lumen should be selected


Lumen > use hardware Ray Tracing when available checked on
Ray lighting mode: surface cache

Software ray Tracing mode: detail tracing

Shadow map method = virtual shadow maps
Don't turn on ray traced shadows yet. Only turn it on when you're getting banding on the shadows or noise, otherwise you can set it per light to turn it on. Turning it on by default is computationally very heavy.
In the Scene
Two lighting setups: static (baked lighting) and dynamic.
Static is when you put lights in the scene, and then you save that information into the game. It is a one time computation, you don't need to compute it again if nothing changes. It does not take any extra resources when running the game. Biggest thing is that you can't get shadows, no real time. It bakes onto textures.
Dynamic is real time lighting. This is what Lumen is, taking the dynamic lighting and building on top of it. These lighting workshops will work on Dynamic Lighting. You get more indirect bounce light with Dynamic (Movable in Unreal) lights.
Unreal has Static, Stationary, Moveable lights.

Stationary lights are in-between static and moveable lights. You can't move the lights, it allows for partially baked lighting, and allows for dynamic shadows from moveable objects.
Static lights were used in the past for something called light painting. It helped to by adding contrast or exposure to a scene to draw the players eye. It also helped to create fake bounce light. Good example of what this looks like.
Tip If you're getting annoyed that your outliner is filled with a bunch of objects, use the filter menu to see only lights that you want to work with.

Directional Light
Directional Lights are basically your sun. A point infinitely far away that lights the entire scene. The translation values don't change anything, but the rotation values will change the angle of the sun. You should really only have one.
Tip control + L can change the angle in the viewport of the directional light
Intensity: this is based on real world units to measure intensity of lights.
Light Color: you can choose the color of the lights, but don't mess with this unless you know how it will interact with your textures (think if you had a blue light, your yellow textures will turn puke green). Rely more on light temperature.
Source Angle: if you increase this it will soften the edges of the shadow. An overcast day will have softened shadows vs a clear day will have sharp shadows. If the size of the light is bigger, the shadows will be softer (think when its overcast, the light bounces everywhere in the clouds, and then the light is diffused to the ground. You can think of the clouds as somewhat of an extra light source). Aside from directional light (which still has a bit of a soft shadows), you should always have soft shadows for other lights.
 |
| ms paint rendition of what happens with the source angle |
If you want the light to stop showing up in your scene, turn off 'affects world' so it won't turn on upon render time.
Cast Shadows: pretty self explanatory, tell it to cast shadows or not.
Indirect Lighting Intensity: you can increase the intensity of how much bounce light there is. Be careful with this.
Volumetric Scattering Intensity: controls how much the light scatters in a volumetric (like a height fog. If you don't have a height fog it won't show anything). Biggest use of this is creating your own god rays. Fog can also flatten out your scene if its too much.
Lighting Channels: You can have it so that certain lights only affect certain meshes. At the moment they only have 3 different sections. (Similar to light linking in Maya)
Point Light
Attenuation Radius: changes the radius of where the light affects things. inside has light. outside no light
Source length changes the height of the point. Changing the source length can help elongate highlights when you want to bring them out.
"Use Inverse Squared Falloff": tells you how fast the light is falling off. Checking it off changes it to an exponential falloff. You can adjust other options below this one as well.
Say you want to you want to use a point light to brighten up an area, but you don't want it to be apparent, turn the specular scale to 0 and move the point light back a bit. All meshes will have some sort of secularity. If it's supper specular (shiny), then you will see a bright white dot where the point is. Turning the specular scale to 0 fixes this.
Spot Light
Change the inner cone and outer cone angle to mess with the spot light. If these angles are the same then then will have a very sharp spot light. Has similar settings to the other lights.
Rect Lights
One of the most used ones. Just a light in the form of a rectangle. Has a bunch of similar settings to previous lights.
It also has Barn Door angles, which lets you get a softer falloff on the edges for the light. Used for stuff like a half opened door, windows, fireplace. Helps to change the shape you want to focus the viewers eye.
Starting to light.
Post Process Volume Settings

Before starting, make sure you turn off the default settings to stop the auto exposure. We don't want to work with this when we light.
Adding Lights
Notice how the light changes when we include a background plane


Three Point Lighting Setup
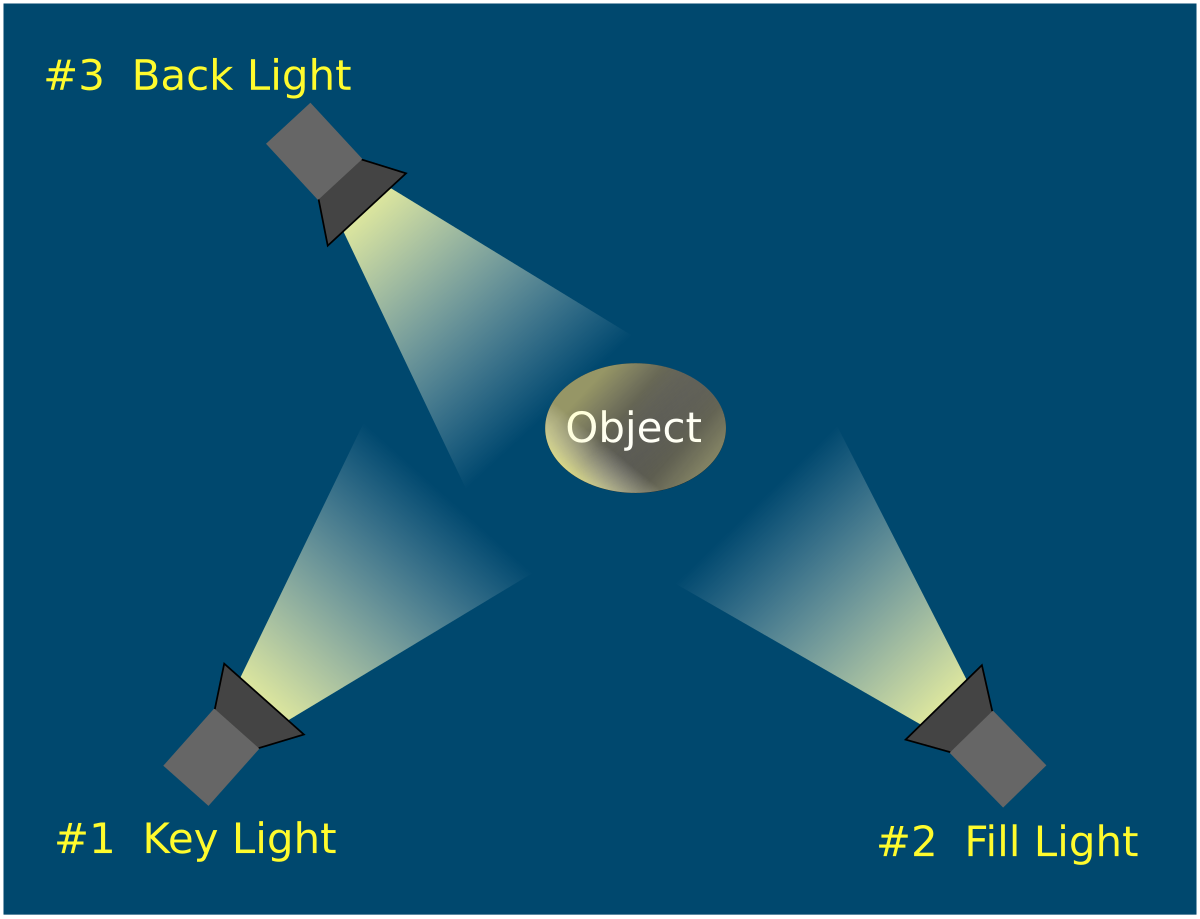
Key Light: Your major light, should light up the majority of your object and also show off the most important stuff.
Think about sculpting with light. Shadows are just as important in showing off the dimensionality of your form. If there is too much light everything looks flat.
Tip for Rim light - it will generally opposite to your camera. It's supposed to separate your object from the background.
Fill Light: used to lighten up shadows. Will have the lowest intensity out of all your lights.
 |
| example of a bad rim light |
When doing this setup, a good tip is to do key then rim then fill. Fill is last because it is doing the least amount of work.
One of the most important parts of this is that you want the the extremes of both dark shadows and light highlights. You want to show off a wide spectrum instead of your values clustered in one area.
Showing off your work
In the bottom corner of Unreal, you can type:
r.highresscreenshotdelay 100
This changes the time it takes to make a high resolution screenshot. The 100 determines the amount of time it will take to make a high resolution screen shot, it will cutoff the render after a certain amount of time.
In the high resolution screenshot settings, screenshot size multiplier = 3.
Make sure that the camera's focus is on your object. Go down to your camera's focus settings and use the eyedropper option to choose the object in your viewport.
Why do i have blotchy screenshots? possibly due to low samples. Low samples = less computation but more noise. You can change the sampling on the lights by going to ray tracing > samples per pixel. Change it by 4 to see if it helps.


No comments:
Post a Comment