
We're making a new project this semester, focused on learning Vertex Animation Textures (VATs). You're going to need to make a Houdini Project, as well as an Unreal Project inside the Houdini Folder. We'll be using Houdini 20.5 and Unreal 5.4.

C:\Program Files\Side Effects Software\sidefx_packages\SideFXLabs20.5\unreal\5.4
You'll want to grab the SideFX_Labs folder you'll find in here. Copy it, and then go to your unreal project. If it doesn't have a plugins folder make one. Paste the SideFX_Labs in here.

In your Unreal Project, go to settings>plugins, search for sideFx labs in unreal. It should be turned on.

Starting the Houdini File
3 Ways of Exporting data
- Rigid Bodies: Static meshes, animation per chunk, very inexpensive.
- Cloth Sim (Constant Topology): Same topology through entire simulation, setting position and normals of mesh over time. Anything that keeps the same topology over time can be animated with cloth sim (could animate facial animation).
- Fluid: Changing topology, fluids, volumes, some color information. Could animate fire with this as well.
Start with a Geometry node named 'RBDVATs'.
Bring in any test geometry. At the top left there's a Model Shelf, where you can find a shatter button. Click on it. You can then use an exploded view node to see how its fractured.

Usually when you model in Maya, you're modeling manifold geometry, geometry that surrounds the volume. You aren't modeling the inside. What you did here is converted the geometry here into a volume, basically using Voxels. Then the scatter node creates points within the volume. The amount of points translates to the amount of pieces you want your model to break into.
You usually don't want to use voronoi to fracture it, however you can use it to break into big pieces, then continue to break up each subsequent piece so it looks more natural.
You can also use a rbd material fracture node. Inside the parameters you can also adjust what kind of material is fracturing. The default is concrete.


Next we want to get rid of the material. Look for an attribute delete node. In the primitive attributes dropdown, look for 'shop_materialpath' to get rid of it.


You can name the switch node 'FracturedCharacter'.
 |
| The network so far |
Applying the RBD solver
NOTE: Chris showed us the DOP network way. Doing it this way for some reason did not let us use the attribute wrangle node to apply the explosion. I'll show both ways but I prefer the rbdbulletsolver node. Will update when we find a solution to the DOP network issue.
Now go up to the object view in the network. On the top right shelves, there should be a Rigid Bodies shelf. Look for RBD Fractured Object.


Back in the RBDVATs node, we can see this added a rest node, packed our geometry into primitives and then created another null node named TO_DOPs and then another dop network import. You can see your simulation with the dopimport node. Your character should fall/. That means it's working.
 |
| object level |
Back in the objects network. you'll see the autodopnetwork node, its where you'll do your all your physics. With any kind of simulation networks, you're configuring the physics server of the simulation.
Look for the Collisions tab in the top right of the shelves. Look for a ground plane and select it to bring a groundplane_object. Ground planes look like it ends but they go off into infinity.
(I went back and added a transform node to our object and translated it up it falls onto the ground plane instead of being inside it)
When playing the simulation it can appear fast. Select the clock on the timeline to view the simulation in real time.
 |
| Current Network |
OTHER WAY OF SETTING THIS UP Look for a RBD bullet solver node and add it after the packed primitives. Go into the parameters, look for Collision> Ground Type > Ground Plane.

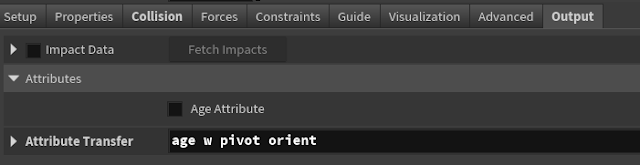
IMPORTANT ATTRIBUTES TO ADD: Exporting just this will not work. The VATs export node needs more attributes in order to work. Go into the rbd bullet solver node > output > attribute transfer > you need to add the attributes 'pivot' and 'orient'. It won't work without it.
You can connect the bullet solver node to a null node named OUT and you're done. Simulation should play.
Adding the explosion effect.
Look for a sphere node. Position this near or inside the test geometry. Name the sphere 'bomb'.

Now you need a normal sop. You're calculating a normal for all the faces of the sphere. Click this icon to the left of the viewport to see the normals.


 |
| using an add node to visualize the transfered normals. delete the add node afterwards |
Now look for a point wrangle node. We're going to write a couple lines of VEX here.

Write This in the VEXpression box:
v@v = v@N; The @v is creating a new attribute at every point. We're creating it and naming it v, which stands for velocity, and we're make the velocity attribute equivalent to the normal vector of that point. You can even add a parameter to control as well.
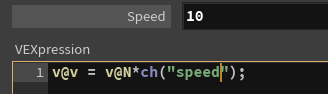
v@v = v@N*ch("speed");
Now go back to frame one and replay the simulation. You should see your geo explode away from the position of the sphere.
Exporting
On the object level, make a rop network. Search for vertex animation and select the Labs Vertex Animation Textures node.


Make sure the mode is Rigid-Body Dynamics and the output engine is Unreal Engine since that is what we will be using. For the input geometry look for the output null node that you made. Make sure you select 'export relative path (so that the text will have ../.../).
Tip: If you name your output node in all uppercase, it will show up first in the houdini outliner when choosing inputs.
That should be all you need. Hit Render All. It might take awhile to bake out the frames.
When you export it, you can find it in your exports folder (if you set your houdini project correctly) and you will get an fbx and three textures (the color, position, and rotation). The fbx is the initial state of your geometry.
 |
| they come in these folders |
Unreal Time
When you import the fbx, turn off all the options. The only settings you should have on are:
- Vertex Color Import Option: Replace
- Transform Vertex to Absolute: Yes
- Normal Import Method: Import Normals and Tangets
- Convert Scene: Yes
- Override Full Name: Yes
- Material Import Method: Do not create Material
- Reorder material to FBX order: Yes
If you need mesh lods you can turn it on but we don't need it, so we'll keep it off.


Texture Settings
Importing the exr textures as normal. Open one of them and change these settings:
- Use Fast MipGen Filter: Yes
- Compression settings: HDR (RGBA16F, no sRGB)
- Texture Group: 16 Bit Data
- Mip Gen Settings: NoMipmaps
We change these settings so that unreal does not do any math calculations on the colors that hold our data.
If you look at the texture images themselves, you'll see they're broken up into columns. The columns represent the data for every individual point.
Material
Create a new material. With the new material selected turn off tangent space normals and also change Num Customized UVs to 6


You're done with the material. Create a material instance and add all the textures to the Houdini VAT parameters

That's it. Now assign this material to the fbx. Brining it into the scene will automatically start playing the VAT.


No comments:
Post a Comment