Part 2 of our VBD smoke session.
NOTE: I had an issue where I left the display flag on the solver when i saved and exited the file. When I tried to reopen it it kept wanting to cook and would not respond. To fix this, go to the bottom right where it says Auto Update and turn it to manual (you might have to hit escape a bunch of times here). This will make it so that it only updates when you tell it to. Now you can hit the display flag on the file cache we made last time.
Making a volume to contain it
 |
| burger |
We want to contain the smoke so that its not clipping through the pipe we made. To do this we'll make a bounding box for our volume. Make a time shift node and navigate to the frame with the biggest volume in the viewport. For us it was around 450. Right click on the Frame parameter in the timeshift node > delete channel. We want it to be a static frame, we don't want it to change depending on the timeline.
Next make a bound box, renamed to BoundingBox. You don't need to change any parameters here. It will create a polygon box around your volume.
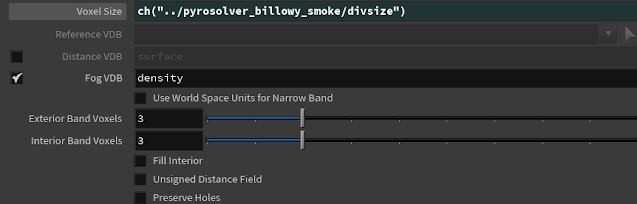
Then you'll need a vdb from polygons node. We want to make sure that the voxel size is the exact same from our pyrosolver. Go back to the pyrosolver node and find the voxel size parameter. Right click on it and select 'copy parameter'. Then go back to our vdb from polygons node. In that voxel size parameter, right click and hit 'Paste Relative References'. You'll see that it pastes 'ch("../pyrosolver_billowy_smoke/divsize")'. This connects the two parameters, so this vdb from polygons node will update when you update the pyrosolver. We also need to change the distance vdb to off and the fog vdb on.
Now grab a volume mix node. the first input is our vdb from polygons node, the second input is our original smokestack file cache node. The mix group should be @name = temperature.
 |
| we have a defined volume |
Clipping the smoke stack
Now we want to clip the smoke stack so it doesn't look like its going through the geo.
We could use another volume mix with the subtract operation, or a volume VOP (node based network to program VEX). But the best solution we've got is to just use a volume wrangle node and write in VEX.
 |
| Example of the inside of a volume VOP to do this. Its reading the first and second input's density primitive name and then mixing them |
We do need another extruded tube to block out the shape that we don't want our vdb to go through. Add a vdb from polygon node to turn it into a vdb to subtract with. The tube has a center of -0.7 and 20 columns. The poly extrude has a distance of 6 with output back on. Make sure the vdb is a fog one instead of distance one. Also paste the relative reference of voxel size from the pyrosolver. Now in the volume wrangle node, write this:
density = lerp( volumesample(0,"density", @P), 0, volumesample(1, "density", @P));
It's just a default lerp from the original volume, to 0, with the new volume we made determining where the 0 should go.
Our volume should now no longer clip through it Making Volumes Loop
Now we need to loop the smoke sim. This is a bit tricky, but we can do it with some vex code. Create a null node and name it LoopControl.
 |
| Press z to bring up the shape node selections and c to bring up the colors for nodes |
In the parameters, go to the icon next to the name at the top left > Parameters and Channels > Edit Parameter Interface.
You'll see this window pop up. Drag 5 Integer Type parameters from the left side into the middle 'Existing Parameters'. You can change the name of the variable and the label that shows up in the parameter box in the right box 'Parameter Description. You'll need:- Transition Amount
- Offset Amount
- Start Transition
- End Frame
- Offset Second Cache
For transition amount and offset amount you can change their default values to 40 and 140 respectively in the channels tab to the right.
 |
| Offset amount default value |
Hit apply and you should see these parameters appear for the null node. alt + e to bring up the code editor.
Start Transition:
ch("./end_frame")-ch("./transition_amount")
End Frame:
ch("../smokeBake1/f2")-ch("./offset_amount")
Offset Second Cache:
ch("./end_frame")-ch("./offset_amount")
Note that '../' means to go up a level to another node, while './' means within this node. The ch("../smokeBake1/f2") is our original file cache node, and the f2 specifically means the second frame or end frame.
Now we need two time shift nodes into a volume mix node.
In the first time shift node's frame, write:
$F+ch("../LoopControl/offset_amount")
In the second time shift node's frame, write:
$F-ch("../LoopControl/offset_second_cache")
Then for the volume mix, change the mix method to blend. In the blend parameter, open up the expression editor (alt+e) and write this:
if($F<ch("../LoopControl/start_transition"),
0,
if($F>ch("../LoopControl/start_transition") +
ch("../LoopControl/transition_amount"),
1,
($F-ch("../LoopControl/start_transition"))/
ch("../LoopControl/transition_amount")
))
 |
| what's kinda happening with our blend |
If you've done it correctly, you should be able to change the timeline to 1-360 and watch a seamless loop. For the final nodes, make a convert vdb node, and convert to VDB.
Make a final file cache node. For the end frame setting, write: ch("../LoopControl/end_frame")
Save this to Disk. This will take awhile but thats all that needs to be done.Importing into Unreal
Look into the folder, you'll see a bunch of files were generate them. You only need to drag one of these into the unreal project. It understands it is part of an animated sequence, so long as they're all named the same.
For the settings, change the attributes A to 32bit float. The dimensions at the bottom is how big our smoke is going to be. WARNING: this can be memory intensive and can cause Unreal to crash. Close out any other programs to help with importing this.
Once that's done importing. Go into the content browser, in the engine folder look for sparse volume texture viewer. Drag it into the scene. This is only used to see if we've imported it correctly.
Change the sparse volume to our looping smoke and make sure that playing and looping is turned on. If you don't see it it might be because it's really small. Now that we know it worked. Look for a SparseVolumeMaterial in the engine folder. Make a copy of it and put it in your content folder. Create a material instance of this.
Inside the material instance, change the sparse volume texture to our vdb we exported.
Look for heterogenous Volume in the place actors box. Drag and drop it in the scene. Change the material of the volume to our material instance we just made. Also make sure looping and playing is turned on as well.

Now the heterogenous volume should show our smoke (although still tiny). Rotate it 90 degrees and scale it up, and it should be done. This material should also allow you to color the smoke however you want for now.