We'll be looking at the Legacy Pyro FX today.
We want to export this out not as a volumetric but as dynamically remeshing object.
In Houdini create a non animated test geo. We went with the Tommy Test geo.
You'll want to go to the top right shelf and add a new shelf named "Legacy Pyro FX". It might be hidden in the extra 'shelves' options.
On this shelf, click the 'Flames' with your geo selected.
It'll generate a DOP network and a pyro import geo node. You no longer need the source, and can turn off the autoDopNetwork. Just into the pyro import node.
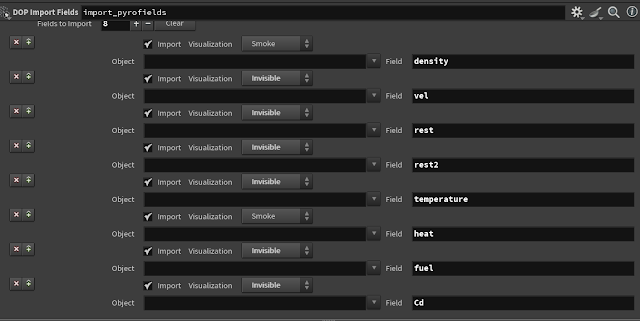
You'll see these nodes. Click on the import_pyrofields node
These are what goes into a pyro sim. You can change the 'heat' field to visualization: rainbow to see how it looks.
Create a delete node.
In the parameters change the group to '@name= density' and delete non-selected. So we delete everything else.
This is VEX code. What it's saying is to get all the objects that are part of the density group. The @ means an attribute, so look for the attribute name.
Do the same thing to isolate the heat
Now we're going to bake out this simulation so we're not constantly recalculating the sim. Create a file cache. Check on 'load from disk' option and change the name to FireSource. Save to Disk. The sim should run better now since we'll be loading from the disk (if we change any previous attributes before this node, we'll have to resave it disk).
Find two frames about 100 frames apart that look somewhat similar to each other. We'll make a cycle out of this. Drop in a make loops SOP
When you first look at the parameters for make loop. You'll see that the Start frame and End frame are highlighted as blue. This is because they are connected to the timeline. You can left click on these options to see the VEXpression that is driving this.
Output Type should be Iso Surface and the mode should be Volume Sample. We adjusted the offset until we got a mesh that looked like fire but wasn't cut off by the top.
These polygons are actually inside out. You can tell something isn't right since the faces are dark blue. Hit the D key to show the display options
Now we need to put a reverse SOP to reverse the normals. It should display normally now. But now we need them as tris. Bring in a Remesh SOP. This turns it into tris.
Add an attribute blur node to help with smoothing the geo out.
Now for this sim, the Poly Reduce node doesn't help much, but it does help to know about this. You can use it quickly to make different Level of Detail models (LODs). You can determine the percentage of polys you want to keep or the max amount it should have
 |
| Turn on bypass for the poly reduce node so we don't work with it |
Add a Clean sop to help clean up the model. Turn on 'Manifold-Only Topology'
Add a Normal SOP, group type: points. It calculates the normals of the vertex by taking the 3 vectors point to the other vertices this one is pointing to, adds them up together and then divide by 3. (this is an important step, we need this)
Next, attribute from volume SOP. We need to go back up to the make loop node, drag off of it and input it to the 2nd input of the attribute from volume SOP. If its too far up, drag off of the make loops node, and alt click to make a pin dot to help organize it a bit better.
Exporting
Create a ROP node, inside the rop node create a labs vertex animation. Take the input geometry as the null node we just made.
Change the Lookup table format to HDR (ExR/TIFF as RGB 16/32 in Engine) .exr
Render all.
Exrs are useful as the cover the entire range of colors possible and stores them in a linear color space.
Name it what you want in the export tab and then hit render all.
NOTE: This one you'll need to render two passes. One for the lookup table and one for the rotation/position/color exrs. After the first one is finished, change the 'Render Pass' to Second Pass.
In Unreal
The import options for the fbx are the same as last timesThe only settings you should have on are:
- Vertex Color Import Option: Replace
- Transform Vertex to Absolute: Yes
- Normal Import Method: Import Normals and Tangets
- Convert Scene: Yes
- Override Full Name: Yes
- Material Import Method: Do not create Material
- Reorder material to FBX order: Yes
If you need mesh lods you can turn it on but we don't need it, so we'll keep it off.
When you import the geo, its gonna import as a bunch of floating tris. You'll need to make the material to make it right.
Similar to the other houdini materials, turn off tangent space normals, and make 4 custom uvs. Here we've just added two colors with a lerp node.
Make a material instance and attach the exrs we rendered out. MAKE SURE you've right clicked on them in the content browser, scripted asset actions> Houdini Config Textures for VATs (HDR).
Note: this week we didn't entirely get it to a work state. Its a start. We'll have to look into this more.


No comments:
Post a Comment