
Our capstone game Husk Planet cites Journey as an inspiration for the art style, so I wanted to try my hand at make the sand shader within Unreal. I found this incredibly helpful tutorial by Alan Zucconi that describes in detail how he achieved this shader within Unity, as well as a download for a demo Journey scene on Github by AtwoodDeng, the GDC recording with thatgamecompany's John Edwards explaining how they did it, a sand shader tutorial from Ben Cloward and a Unreal Engine Desert Guide by Gatyh Interactive. I also found a post by Gastón Zabala on his Journey inspired shader inside of Unreal. All of these resources were heavily influential in developing this project.
The Landscape
I followed this tutorial here for the desert geo: https://www.sidefx.com/tutorials/procedural-desert/

Basically you start with a heightfield and then generate several types of noise, manipulate it with different masks and then blend them all back together again.
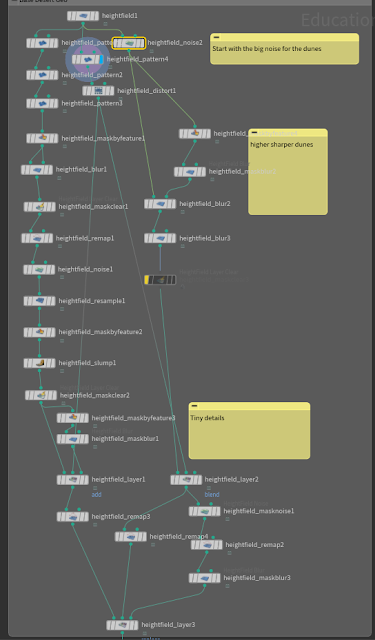
 |
| Final Landscape |
Inside Unreal
Inside of Unreal I imported the landscape (make sure your Houdini Engine plugin is installed for Unreal).
Diffuse Model
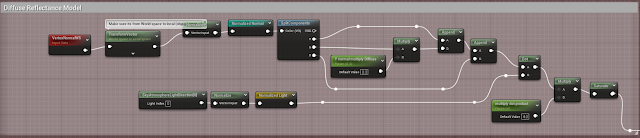 |
| Use this as the alpha channel for a lerp node between the sand color and the shadow color |
Normals
 |
| Normal Ripples |
 |
| Slope Mask |
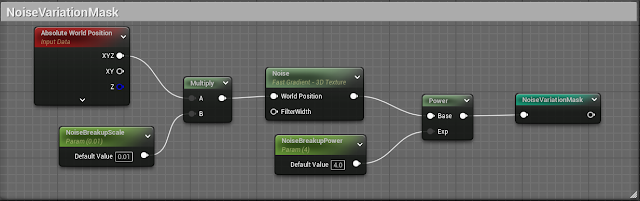 |
| Noise Variation Mask |
 |
| Random Noise Normals |
I really struggled here because I wanted the noise to be visible, but not to cause visual glitches. Before the mipmap folding function, the distant dunes would not show any noise because mipmaps cause noisey images to be blurry and unusable.
Mipmap folding
While following Alan Zucconi's tutorial, he mentioned this blog post from Paul Nasdalack on indieburg about improving the glitter in the sand by using a technique called Mipmap folding. I used the code he suplied and made a material function inside of unreal to make a texture sample node for texture objects that I turned mipmaps off.
I am unsure if I have successfully recreated his function inside of Unreal. For some reason I could not get the function tex2Dlod to work inside of Unreal's custom, I would always get the error 'Unsupported intrinsic'. I believe this has something to do with the sampler variable you have to supply.
float4 color = Texture2DSample(texObject, texObjectSampler, txd.texScale(uv,1));
Note that if your input texture object is named 'texObject' your sampler state will be 'texObjectSampler'. But this doesn't work with tex2Dlod so I'm not sure why. But I tried translating the mipfold function into unreal nodes so here is the Material Function:


Specular
 |
| Rim Color |
 |
| Ocean Specular |
 |
| Glitter |
For this I took the glitter distribution function from the github journey demo scene, as well as using the Random Normals for the mask.
Post Processing
I saw a tutorial that had you create a custom LUT table for Unreal by taking the base rgb table from the Unreal documentation, bring it and a screenshot of your scene into photoshop and just using photoshop adjustments to get the color you want. Then export just that LUT with all the ajustments still on it and use it in Unreal. Pretty nifty tool but I found out later it's not a great idea to rely upon it completely because the LUTs conversion happen after Unreal converts it from HDR to LDR, so it won't affect monitors that support HDR (something along those lines I'm not entirely sure myself).
And that's about it for the shader. I'd like to come back to this later and maybe revisit the noise or the ripples to create something in substance designer to use.
Other Resources I found that helped through the process:
- Found this Lighting tutorial here by Dusty Pixels. Showed off a bit on hdris and using cubemaps
- Physically Based Lighting approaches in Unreal 5 on the Visual Tech Art Channel


No comments:
Post a Comment