Friday, 6 December 2024

Tech Art Fall Final Project 2024 - Sand Shader


    Our capstone game Husk Planet cites Journey as an inspiration for the art style, so I wanted to try my hand at make the sand shader within Unreal. I found this incredibly helpful tutorial by Alan Zucconi that describes in detail how he achieved this shader within Unity, as well as a download for a demo Journey scene on Github by AtwoodDengthe GDC recording with thatgamecompany's John Edwards explaining how they did it, a sand shader tutorial from Ben Cloward and a Unreal Engine Desert Guide by Gatyh Interactive. I also found a post by Gastón Zabala on his Journey inspired shader inside of Unreal. All of these resources were heavily influential in developing this project. 

The Landscape

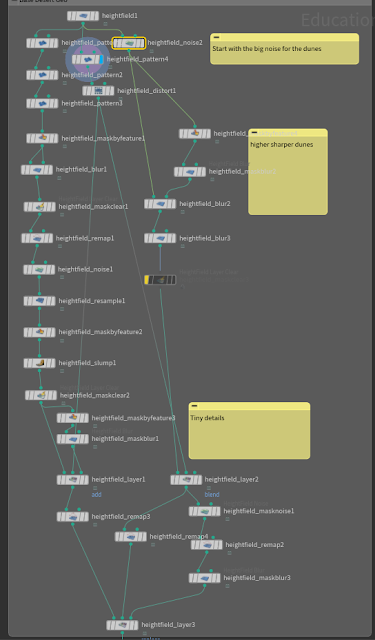
     I followed this tutorial here for the desert geo: https://www.sidefx.com/tutorials/procedural-desert/


    Basically you start with a heightfield and then generate several types of noise, manipulate it with different masks and then blend them all back together again. 
Final Landscape
    The tutorial goes further and makes masks for different materials to be used in Unreal, but I don't necessarily need it since I'm only making one material. Export this network as a 
as a Houdini Digital Asset.

Inside Unreal

    Inside of Unreal I imported the landscape (make sure your Houdini Engine plugin is installed for Unreal). 

Diffuse Model

Use this as the alpha channel for a lerp node between the sand color and the shadow color
    These section is taken from 
Gastón Zabala's node network and is itself based off of the Diffuse Reflectance model that John Edwards said they used for Journey.

Normals

Normal Ripples
    This part was taken from the Gatyh Interactive video. It uses both a slope mask and a noise variation mask to Lerp between the ripples and a flattened normal. 
Slope Mask
Noise Variation Mask
    For the random noise, I used a gaussian noise image generated from photoshop (got this technique from Ben Cloward), and then used a Mipmap folding function explained below.

Random Noise Normals
    I really struggled here because I wanted the noise to be visible, but not to cause visual glitches. Before the mipmap folding function, the distant dunes would not show any noise because mipmaps cause noisey images to be blurry and unusable. 

Mipmap folding

    While following Alan Zucconi's tutorial, he mentioned this blog post from Paul Nasdalack on indieburg about improving the glitter in the sand by using a technique called Mipmap folding. I used the code he suplied and made a material function inside of unreal to make a texture sample node for texture objects that I turned mipmaps off. 
    I am unsure if I have successfully recreated his function inside of Unreal. For some reason I could not get the function tex2Dlod to work inside of Unreal's custom, I would always get the error 'Unsupported intrinsic'. I believe this has something to do with the sampler variable you have to supply. 
    The function tex2Dlod is a function similar to Texture2DSample(), except you explicitly state the mipmap level you wish to call upon. You have to supply the sampler state you wish to use, the texture coordinates, and then the mipmap level you want (GPUs can automatically calculate a mipmap for you using powers of 2). When I used Texture2DSample it works fine. 
float4 color = Texture2DSample(texObject, texObjectSampler, txd.texScale(uv,1));
    Note that if your input texture object is named 'texObject' your sampler state will be 'texObjectSampler'. But this doesn't work with tex2Dlod so I'm not sure why. But I tried translating the mipfold function into unreal nodes so here is the Material Function:

Specular 

Rim Color
    The Rim color is also from Gastón Zabala's and not much has changed
Ocean Specular
    Ocean Specular also from  Gastón Zabala's, but I also added the more subtle shine area from the Github journey demo scene. I also used the Normal Ripples instead of the just the normals to use in the dot product. 
Glitter

    For this I took the glitter distribution function from the github journey demo scene, as well as using the Random Normals for the mask.

Post Processing

    I saw a tutorial that had you create a custom LUT table for Unreal by taking the base rgb table from the Unreal documentation, bring it and a screenshot of your scene into photoshop and just using photoshop adjustments to get the color you want. Then export just that LUT with all the ajustments still on it and use it in Unreal. Pretty nifty tool but I found out later it's not a great idea to rely upon it completely because the LUTs conversion happen after Unreal converts it from HDR to LDR, so it won't affect monitors that support HDR (something along those lines I'm not entirely sure myself).
    

    And that's about it for the shader. I'd like to come back to this later and maybe revisit the noise or the ripples to create something in substance designer to use. 

Other Resources I found that helped through the process:

Tuesday, 3 December 2024

Learning Python Part 10

 User Experience

Resources: 

  • Mary Denman (from ea)
  • Steve Krug - 'Don't Make Me Think'

Aspects: 

Discovery

    Figuring out where you stand and what you need to do so you can make tools that meet artist's needs. What are the Task goals? The goals need to provide a short list of three to five items. 

    Figure out who the 'Stakeholders' are. Need to spend time with key decision makers to understand their expectations and what this tool needs to do. What software are you using (you'll usually use python for tool making, but sometimes you might need to use Lua, which is a language programmers like to use cause it's lightweight)? What languages will you use to make the tool? What processes will you have to understand, if you don't already? any dependencies for completing tool? any dependencies on you?(what factors outside of your control will impact your tool and its development? What will stop your tool dead in its tracks?) What are your time estimates?

    SWOT: Internal: Strengths, Weaknesses. External: Opportunities, Threats.

    Identify any risks, can you address them now? You are responsible for the assets in a production. 

    It all comes down to Return on Investment (ROI). What resources do you need? (Artists, TAs, Engineers). How expensive is the tool to operate it? (does it need to be updated? how do we have to maintain it through projects?) What is ramp up time? (how long do they need to learn the tool to use it effectively) How much time will this tool save, how much money save/make?

    How marketable is the tool/workflow? How will this make the studio look?

Strategy

    Establishing a vision for the target user (avatar). Understand what the final effect will be. What is the Value Proposition for the tool/workflow? Value Proposition is the emotional delivery of the product (for lighting you're trying to evoke a certain emotion; if its a tool maybe you're trying to evoke relief/reassurance that the user has the correct name generated). Why do people use it and why would they choose this tool over another. 
    What's the roadmap; what needs to be built first next then last. There should be some kind of order.
    Don Norman - 'The Designer of Everyday Things'

User Research

    Who is the end user? How do they want it to work and why they want this thing. Have casual conversations about what's causing issues, what would help them out. Any particular conditions/factors the tool needs to address? Any special needs?
    When is the tool going to be used? Pre-Production, Production, Alpha, Post?
    Has your team tried to make the tool before? Seek team members who know the history of the studio to figure out why they failed to make the tool before. Are there existing tools of it? Can it work with other programs?

Design

    Make it fun to use.

    Make sure you document how the tool works. Because what'll happen is you'll leave the company and they won't be able to contact you to ask how the tool works to update or rework it.

    What scenarios should your design of tool/workflow account for?

    Process Diagrams: models or visuals for how artists interact with tools step by step.

    Create a mockup of what your user interface will look like first, these will change along the way. 

    Prototypes: Functioning or semi-functioning examples (a minimum viable product MVP)

Implementation

    Ensure the tool or workflow works. What performance metrics are being tracked. How can you tell if what you made is good or not?

    Page Brief: one page executive summary of everything. Should be created last.


Design Brief

    This is more concerned with the design and interface of it rather than the backend of it. Understand the constraints (features, functionality, value propositions) the design solution must obey. 
    Create dumb tools but with good design to make people feel good about using it. 
    Also think about who the tool make look good (a lot of times your supervisors)?
    When people use your tool, will it be: Spartan and efficient? or open and customizable?
    No generic statements be specific. 
    Share and discuss the principles you come up with on your tool. If you share it with people then people have a personal stake with your tool and help confirm your integrity.
    Communicate with pictures whenever possible. Sketch out alternatives to your design.

Monday, 2 December 2024

VR Project Week 5

 Finished up the cloth sim for the banners and managed to import them using VATs. Went ahead and textured them myself using an Athenian owl since this playspace is set within Athens. 


    I also managed to get the look at function working with Hercules, as well as updating his anim blueprint to include all the animations we wanted him to have. 

had to include a modify bone so that Hercules wasn't look down at the player's feet

Look at position was determined by the vr pawn (the player)'s location 

Also made a starting map pose animation, updated the wave animation, and made a new flex animation. 


Illumination Models

 Basic Lighting Models The Three Illumination Models: ambient: color of objects in the scene with no direct light on it (When it is in shado...