Friday, 6 December 2024

Tech Art Fall Final Project 2024 - Sand Shader


    Our capstone game Husk Planet cites Journey as an inspiration for the art style, so I wanted to try my hand at make the sand shader within Unreal. I found this incredibly helpful tutorial by Alan Zucconi that describes in detail how he achieved this shader within Unity, as well as a download for a demo Journey scene on Github by AtwoodDengthe GDC recording with thatgamecompany's John Edwards explaining how they did it, a sand shader tutorial from Ben Cloward and a Unreal Engine Desert Guide by Gatyh Interactive. I also found a post by Gastón Zabala on his Journey inspired shader inside of Unreal. All of these resources were heavily influential in developing this project. 

The Landscape

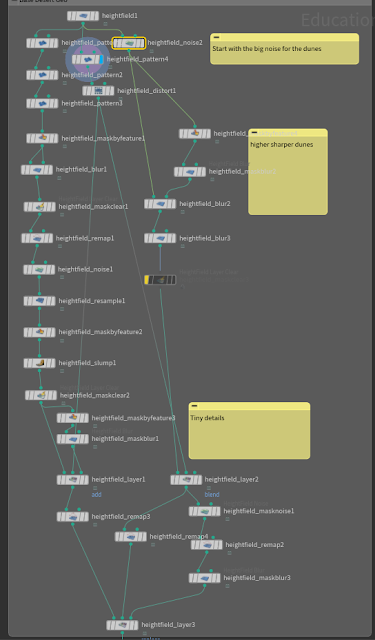
     I followed this tutorial here for the desert geo: https://www.sidefx.com/tutorials/procedural-desert/


    Basically you start with a heightfield and then generate several types of noise, manipulate it with different masks and then blend them all back together again. 
Final Landscape
    The tutorial goes further and makes masks for different materials to be used in Unreal, but I don't necessarily need it since I'm only making one material. Export this network as a 
as a Houdini Digital Asset.

Inside Unreal

    Inside of Unreal I imported the landscape (make sure your Houdini Engine plugin is installed for Unreal). 

Diffuse Model

Use this as the alpha channel for a lerp node between the sand color and the shadow color
    These section is taken from 
Gastón Zabala's node network and is itself based off of the Diffuse Reflectance model that John Edwards said they used for Journey.

Normals

Normal Ripples
    This part was taken from the Gatyh Interactive video. It uses both a slope mask and a noise variation mask to Lerp between the ripples and a flattened normal. 
Slope Mask
Noise Variation Mask
    For the random noise, I used a gaussian noise image generated from photoshop (got this technique from Ben Cloward), and then used a Mipmap folding function explained below.

Random Noise Normals
    I really struggled here because I wanted the noise to be visible, but not to cause visual glitches. Before the mipmap folding function, the distant dunes would not show any noise because mipmaps cause noisey images to be blurry and unusable. 

Mipmap folding

    While following Alan Zucconi's tutorial, he mentioned this blog post from Paul Nasdalack on indieburg about improving the glitter in the sand by using a technique called Mipmap folding. I used the code he suplied and made a material function inside of unreal to make a texture sample node for texture objects that I turned mipmaps off. 
    I am unsure if I have successfully recreated his function inside of Unreal. For some reason I could not get the function tex2Dlod to work inside of Unreal's custom, I would always get the error 'Unsupported intrinsic'. I believe this has something to do with the sampler variable you have to supply. 
    The function tex2Dlod is a function similar to Texture2DSample(), except you explicitly state the mipmap level you wish to call upon. You have to supply the sampler state you wish to use, the texture coordinates, and then the mipmap level you want (GPUs can automatically calculate a mipmap for you using powers of 2). When I used Texture2DSample it works fine. 
float4 color = Texture2DSample(texObject, texObjectSampler, txd.texScale(uv,1));
    Note that if your input texture object is named 'texObject' your sampler state will be 'texObjectSampler'. But this doesn't work with tex2Dlod so I'm not sure why. But I tried translating the mipfold function into unreal nodes so here is the Material Function:

Specular 

Rim Color
    The Rim color is also from Gastón Zabala's and not much has changed
Ocean Specular
    Ocean Specular also from  Gastón Zabala's, but I also added the more subtle shine area from the Github journey demo scene. I also used the Normal Ripples instead of the just the normals to use in the dot product. 
Glitter

    For this I took the glitter distribution function from the github journey demo scene, as well as using the Random Normals for the mask.

Post Processing

    I saw a tutorial that had you create a custom LUT table for Unreal by taking the base rgb table from the Unreal documentation, bring it and a screenshot of your scene into photoshop and just using photoshop adjustments to get the color you want. Then export just that LUT with all the ajustments still on it and use it in Unreal. Pretty nifty tool but I found out later it's not a great idea to rely upon it completely because the LUTs conversion happen after Unreal converts it from HDR to LDR, so it won't affect monitors that support HDR (something along those lines I'm not entirely sure myself).
    

    And that's about it for the shader. I'd like to come back to this later and maybe revisit the noise or the ripples to create something in substance designer to use. 

Other Resources I found that helped through the process:

Tuesday, 3 December 2024

Learning Python Part 10

 User Experience

Resources: 

  • Mary Denman (from ea)
  • Steve Krug - 'Don't Make Me Think'

Aspects: 

Discovery

    Figuring out where you stand and what you need to do so you can make tools that meet artist's needs. What are the Task goals? The goals need to provide a short list of three to five items. 

    Figure out who the 'Stakeholders' are. Need to spend time with key decision makers to understand their expectations and what this tool needs to do. What software are you using (you'll usually use python for tool making, but sometimes you might need to use Lua, which is a language programmers like to use cause it's lightweight)? What languages will you use to make the tool? What processes will you have to understand, if you don't already? any dependencies for completing tool? any dependencies on you?(what factors outside of your control will impact your tool and its development? What will stop your tool dead in its tracks?) What are your time estimates?

    SWOT: Internal: Strengths, Weaknesses. External: Opportunities, Threats.

    Identify any risks, can you address them now? You are responsible for the assets in a production. 

    It all comes down to Return on Investment (ROI). What resources do you need? (Artists, TAs, Engineers). How expensive is the tool to operate it? (does it need to be updated? how do we have to maintain it through projects?) What is ramp up time? (how long do they need to learn the tool to use it effectively) How much time will this tool save, how much money save/make?

    How marketable is the tool/workflow? How will this make the studio look?

Strategy

    Establishing a vision for the target user (avatar). Understand what the final effect will be. What is the Value Proposition for the tool/workflow? Value Proposition is the emotional delivery of the product (for lighting you're trying to evoke a certain emotion; if its a tool maybe you're trying to evoke relief/reassurance that the user has the correct name generated). Why do people use it and why would they choose this tool over another. 
    What's the roadmap; what needs to be built first next then last. There should be some kind of order.
    Don Norman - 'The Designer of Everyday Things'

User Research

    Who is the end user? How do they want it to work and why they want this thing. Have casual conversations about what's causing issues, what would help them out. Any particular conditions/factors the tool needs to address? Any special needs?
    When is the tool going to be used? Pre-Production, Production, Alpha, Post?
    Has your team tried to make the tool before? Seek team members who know the history of the studio to figure out why they failed to make the tool before. Are there existing tools of it? Can it work with other programs?

Design

    Make it fun to use.

    Make sure you document how the tool works. Because what'll happen is you'll leave the company and they won't be able to contact you to ask how the tool works to update or rework it.

    What scenarios should your design of tool/workflow account for?

    Process Diagrams: models or visuals for how artists interact with tools step by step.

    Create a mockup of what your user interface will look like first, these will change along the way. 

    Prototypes: Functioning or semi-functioning examples (a minimum viable product MVP)

Implementation

    Ensure the tool or workflow works. What performance metrics are being tracked. How can you tell if what you made is good or not?

    Page Brief: one page executive summary of everything. Should be created last.


Design Brief

    This is more concerned with the design and interface of it rather than the backend of it. Understand the constraints (features, functionality, value propositions) the design solution must obey. 
    Create dumb tools but with good design to make people feel good about using it. 
    Also think about who the tool make look good (a lot of times your supervisors)?
    When people use your tool, will it be: Spartan and efficient? or open and customizable?
    No generic statements be specific. 
    Share and discuss the principles you come up with on your tool. If you share it with people then people have a personal stake with your tool and help confirm your integrity.
    Communicate with pictures whenever possible. Sketch out alternatives to your design.

Monday, 2 December 2024

VR Project Week 5

 Finished up the cloth sim for the banners and managed to import them using VATs. Went ahead and textured them myself using an Athenian owl since this playspace is set within Athens. 


    I also managed to get the look at function working with Hercules, as well as updating his anim blueprint to include all the animations we wanted him to have. 

had to include a modify bone so that Hercules wasn't look down at the player's feet

Look at position was determined by the vr pawn (the player)'s location 

Also made a starting map pose animation, updated the wave animation, and made a new flex animation. 


Tuesday, 26 November 2024

Learning Python Part 9

First we went over Pep8 standards, you can find them here: https://peps.python.org/pep-0008/

    Note on the upcoming HW, we need to use PyQt5 but Python 3.12 does not support it. We needed to go down to python 3.9 inside of visual studio and visual studio code. I also had to do 'python pip install PyQt5' for vscode to run it. 

    To check over if you have PyQt5 installed correctly, try importing PyQt5 and run the script to see if it runs without errors. We're going to be importing these modules: 

import sys

from PyQt5.QtGui import QWindow

from PyQt5.QtWidgets import QApplication, QWidget, QHBoxLayout, QPushButton

    You're going to want to create a class to hold your interface. Start by creating a class that inherits the QWidget class.


    Next we need:
app = QApplication(sys.argv)

    Because we are going to be sending arguments from the command line to our window. We're also going to be creating a seperate thread  thats running for our window.
    To run the script and open the window, you need to include
window = MyHBox()
window.show()

app.exec()
    Running this will give you an empty window with the command prompt open. The window is tied to the command prompt, if you close the command prompt it will also close the window (But if you close the python window the command prompt won't close).

    Now we want to specify the type of layout for our window. For a horizontal layout, we can use QHBoxLayout()
    
QHBoxLayout() is like a container node within Houdini, it's going to hold stuff. Running this again will get you another empty window but smaller. But once you start adding buttons, you can see the layout come into play. 

    The QPushButton needs a name, and a reference to itself, so it knows where to attach the button. Now you should get a window with 3 buttons in it. 
horizontal layout with 3 buttons

    If you want a vertical layout, you can change QHBoxLayout() to QVBoxLayout(). There's also a grid layout. With a grid layout, you need to specify an x and a y value for it. 
   
grid layout with 10 buttons

    The above code says we want to make 10 buttons. The x coordinate is x divided by 5, but the // tells python to divide the integer
, but it will not give us a floating point number. Instead it takes the 'floor' of the answer. Meaning 1 divided by 5 is 0. Think of rounding down. The y coordinate is y modulus 5, meaning it takes the remainder of the division. 
    So far we've made buttons, but they don't do anything. 

Slots to handle signals
Assign slot to handle signal 
self.<Signal Name>.connect(<Slot Function Name>)
    The signal can be many things, from push down to release to hover over, etc. You choose the signal you want the button to have. Then once the button gets that signal, it send that signal to everything in the script, so that anything that is listening to that signal with trigger it's function it's connected to it. This is a much more efficient way that callbacks. 
    Inside of your window class, you can add the connect function right after creating a button to assign a function to it. Here we've chosen the signal 'clicked' so that when we click the button it executes the function. You can look at the documentation to see other signals. 

the function that gets called when we press the button
    Notice how we don't have any parenthesis next to the function eatBacon within the connect function, so we can't send arguments to it. We can use a lambda function to help

lambda

    A lambda is a small anonymous function. It can have multiple arguments but only one expression. It's used to call within arguments. 
variable = lambda <arguments>: <expression> 
the print button name function

  Here we have 2 buttons, one named Johnny and one named Joey. In the connect function. we have a lambda function, with a colon and then the function we want to pass through. 

What if we want to create a for loop to create a bunch of buttons like in the grid layout. We can use partials to help with connecting the functions to the buttons (before you had to do it by hand, because if you did it in a for loop python would only remember the last button in the loop). All you have to do is include partial() inside the connect funciton. Then inside of partial, first include the function you want to have, and then a 
the module for partial
    Make sure you also add:
from functools import partial
    So that we can use partial in our function.

    If we want to add icons, add the tiny pngs to the folder you're building the application in. Then you'll want to make a list with tuples with the name you want the buttons as well as the png names.
make sure you also grab the QIcon module from the PyQt5.QtGui
    Add the png with the setIcon function. 


Thursday, 14 November 2024

VR Project Week 4

 Finishing Vases

   I needed to sim all of the vases in houdini, export them out, and set up all of the respawning capabilities of all vases once they were all destoryed. I used the same anim sequence but reversed for when the vases spawn back. Jason and Noa had helped me come up with the system for spawning back the vases.
Inside of the function in the BP manager

Inside of the event begin play of BP manager to get total of all bp vases in scene

Reset custom event inside of the BP vase

The collision event inside of BP vase.

    Mark helped to paint the skin weights on the final Hercules Mesh, and was able to get it into Unreal. He made an idle and an additional two poses for Hercules. I went in later and added everything into an animation blueprint. I also added in the function of Hercules can track the player's movement with his head. I have had some trouble with this and I fear it is due to the orientation of the joints on his head, but this will have to be a fix for later. 
This is getting the position of the player when inside a sphere collider in Hercules' BP and then setting that to a variable. The ABP listens to a BPI


Also included triggers for a wave animation and a heart pose


In the ABP this is what I used for the head looking at the player


Tuesday, 12 November 2024

Learning Python in Houdini Part 8

 Exception Handling

    Don't try to do it in code (like with if statements), it's awkward, slow, programmer's don't like doing it. But is should be done, exceptions could leave resource in an 'inaccessible state'.
    What happens if your script tries to open a file, but it crashes? Your file has been opened to a script that doesn't exist anymore, and it's possible your file cannot be accessed. It becomes a 'zombie' file. Depending on how bad the crash is, you might have to restart your entire computer in order to open the file.

    Example: say you want the user to enter in a value for scale and then create the object. 
    
    But what if you only wanted the scale to be less than 5? You can raise an error for the user

    We came up with this special situation, and then gave an error message to the user (a pop up box). 

Basic format for handling exceptions:

try:
    code
except ExceptionClass:
    code
except:
    code
else:
    code
finally:
    code
It's either going to: perform the operations in try. If it catches an exception, it will either go specifically to the code bloc where you specified the Exception Class, or go straight to the unspecificed except code bloc. The else statement runs when it does not find any exception. Finally runs no matter what, this statement wille xecute regardless of 'try'. This is an ideal location for resource De-Allocation.  Try is not optional, everything else is optional.
Can have only one empty 'except' at the end before 'else' statement.
Try puts it in a special state where python is geared up to know it might get an exception types (errors).

    Here we're asking for user input again. We use a try statement here (because usually user error is where it's going to break). We want to catch when the user enters zero, because we have a statement that has 360 divided by the user input, and we cannot divide by 0. So when we come accross this, we can use the ZeroDivisionError to tell the user you cannot put in 0.
    We can also put in a ValueError for when users enter things like strings. The final one, the 'Exception' is just a catch all for errors. 
    This will run after you've run the try code, and everything runs smoothly.
   

Exception Classes

 There is an exception class that you can use to make child classes to create new errors to catch. (You  can see more here)
    Here we want to create an error that catches when we input a negative integer. It's a child of the value Error, because it is the most similar to that parent class. We don't actually need to put anything in the class for this one.
    You can test if the number is less than 0, and then raise a SubZeroPigs class. Then in your exceptions:

    This will create a squab instead of pigs if you get a negative user inputted number. Note it needs to be before ValueError, because it is a child class of Value Error, and if you raise it it can also trigger the ValueError exception. 

    There is a way of using a library called traceback and print out the actual data that caused the error in your code, as well as all the steps that led up to it. We've been dealing with this before in Houdini when we get errors in our code.  

File Processing

Four fundamental operations: 
1. Open a file
2. Read file contents to a string OR
3. Write a string to a file
4. Close the file

    Here's the syntax for opening and closing a file. I give the exact file path but had to put an 'r' infront of the path string to let python know it's a raw string (Don't use \ as an escape character)

    Now since we're going to be dealing with user error when they input a wrong file, we can use 'try' to check for errors. 

    For open() there are different types of 'open modes'. 
  • r : opens a file for reading, raises IOError if file doe not exist
  • w : opens a file for writing. truncates if file exists. creates if does not exist (WILL NOT THROW AN ERROR)
  • a : appends to the end of the file. creates if does not exist
  • r+ : opens file for reading or writing. raises IOError if file does not exist (be careful for this, because if you change the file, whatever you read is not what's in the file currently)
  • w+ : opens for reading or writing. truncates if file exists. creates if does not exists
    We can take the contents of the file and give it to a variable.
    inFile.read() will take the entirety of the file, and put it as a string. We then give this to a variable named filecontents. When we run this we get this:

Trying the write open mode

    If you wanted to try to create a file, use the write open mode ('w'). 

    Here we're creating a file named crag.py and opening it for write. Then we're going to assign the rocky variable the houdini node crag test geometry that's already in our scene. Next we're going to write: 
    This writes out the content of any houdini node object entirely as a python script. Then we just close the file, along with testing for any exceptions. 
We shouldn't necessarily need it since usually the write open mode doesn't usually throw an error, unless you're trying to write a place you don't have permission to.
    
Responsible Close
    You must guarantee any file access will not abandon an 'open' resource!. Use 'finally' to guarantee resource closure.
myFilePointer = open(myFile, mode)
try:
    performOperations(myFIlePointer)
finally:
    myFilePointer.close()
Even when the computer is about to crash, the finally node will always run before it crashes.

Context Managers

    Allow groups of statements to be run under control of single objects
with contextManager.Expression as targetVariable:
    doSomething(targetVariable)

Python gives us nice context managers for 'open', instead of try-finally
with open(fileName, mode='r') as fileVariable:
    inputString = fileVariable.read()
with open(fileName, mode'w') as fileVariable:
    fileVariable.write(outputString)
    It handles all the exceptions and trys for you within the Context Manager. It handles the close and everything. Here's an example of how to use it to write out the contents of Roberto into a python file:
And then we can continue this, destroying the rubbertoy and then reading back the contents of the file.
    This method only raises the exception, it does not catch it (meaning it would not print out whatever data it has at the moment of crash).

JSON

   A Json file is like an infinitely recursive python dictionary. It is a dictionary where the 'value' can be a list of directionaries. 
Example of using Json files with python

    First we get the json file and read it. It starts off as a string, and then using 'json.loads' we convert it to a python dictionary. Then we can manipulate the data (maybe append a new key+value), we use json.dumps
    What this does is it converts a dictionary to a bigass string. But dictionaries don't know what new lines or formatting is; so you have to tell it to format a certain way. The indent = 4 with the separators = , ; means whenever you encounter a comma or colon, stick in an indent with 4 spaces. Now you can write this string out as a new json file.

XML

    An XML file has a parent element, and then the parent has child elements, and then those child elements have further child elements underneath it. It has a branching tree structure. HTML is an XML format. 
    Every Element requires an opening tag and a closing tag.
    You can use ElementTree module to parse through an XML file.


Difference between JSON and XML:

    If your data is inherently recursive, use XML (if you're rigging and you want to output all of your bones, use XML to recursive walk through the bone hierarchy). 
    JSON seems to look better formatted when printed out.

Easy Notes Archive

 Tech Art Blueprints Demo Animation State Machines Part 1 Animation State Machines Part 2 Math for Tech Art Part 1 Math for Tech Art Part 2 ...