Friday, 21 February 2025

Houdini Workshop Week 6 - Spring 2025

 Here we're going to do a simulation of an exploding wine glass to test out fluid physics. 

Making the Glass

    Get a profile view of a wine glass. This is the one we'll be using. In the houdini viewport select the front view perspective. 


    To use it in our scene, press D in the viewport, (or look at the bottom of the side toolbar to find an eye icon ).
    Look for background settings and look for your image (we set our project and placed the image in our textures folder). Adjust the size of the image and the offset here. Make sure you're changing the correct perspective view (we're doing this in the front view so we put the image in the front view settings).
    Now look for the Curve polygon button in the top toolbars. Select it.

    In the viewport click once to set the drawing plane, then start tracing our image. Press X in the viewport to select the grid snapping option. 

    Now out of the front view hit spacebar+h to hone the camera on the item we just made in the perspective view. 

    Create a revolve node to make it a solid polygon. 

    Now we want to select the edges on the rim of the cup and the bottom stand to crease them so they stay sharp when we subdivide it. In the viewport turn on the select tool and make sure you're selecting edges. 


After selecting our edges, hit tab in the viewport and look for the crease sop. Hit enter and you'll see a crease node be created with the edges automatically appended to the group so it only creases what you had selected. 

    Add a subdivide node with a depth of 2. Our wine glass geo is complete, to clean it up make sure that the bottom of the glass is at the origin with a match size node. Note that when we first created the curve geo, it might have placed the geo's translation above the origin, just zero it out and it should be fine. 
    We had also scaled down our wine glass since we drew it pretty big in the beginning. You want the glass to at least be small or close to scale because it will affect the simulation. 
    Make sure to create a null node at the very end of your network with the name GLASS_OUT.
translate should be zeroed out

Making the Wine

    Create a new geo node. Inside make an object merge node to get a reference to our wine glass. We'll be making the wine inside here. Make sure the 'Transform' setting is 'Into This Object'

    Select the top third of the wine glass. This will be How empty the glass will be. Hit tab and look for a blast node. You'll see now that part is transparent. 
    Now double click on the outside geo. Make another blast node. You should be left with only the inside faces. Create a reverse node so the normals are flipped facing you. 
    Again select rim edge and then create a poly fill node so it fills in the center. Change the fill mode to quadrilateral Grid. For 
tangent strength make sure it set to 0. 

    Add a poly extrude node with a distance of 0.01 to give it a bit of thickness. Now we should have wine inside of the glass. Add a null node at the end named 'FLUID_OUT'

Making the bullet geo

    Start with a sphere polygon  with radius 0.2, 0.125, 0.125 for the overall shape of the bullet. 
    Add a clip node. Press enter to show the clip plane in the viewport to manipulate it. Where ever the plane is is where the geo is going to get sliced. 
    We don't need to move it now. Select the rim edges and create a poly extrude node to create a tapered edge. You'll need to turn on 'transform extruded front' and then edit the translate and scale values.
    We want to delete the first front faces so it's flat in the front. Select the faces and hit the delete key. This auto creates a blast node for you. 
    Select the open edges, get another poly fill node and make sure it's set to quad grids. Make sure corner offset is also set to 1 to get better topology. Add a subdivide node with depth 2. 
    For the final bit, create a transform node to translate it to where you want the bullet to come from.  
    End with a null node named 'BULLET_OUT'. 

Breaking up the object

    There's the rbd material fracture node and voronoi fracture node that helps to break up objects. We'll be using boolean shatter method for this one.
    Make a grid object from the Object level. Dive into the network. Change the grid direction to the YZ plane and make it big enough to encompass the wine glass. We're going to draw on top of this grid to show where we want the fractures to be. Change to the right view and show wireframe so we can see the bullet right through the glass. 

    Select primitives and then hit n to select the entire grid. Then hit tab and look for draw curves (create). You should now be able to draw on top of the grid. Create several lines from where the bullet will connect. 

Double select one of the curves, hit tab and look for duplicate. This will create a copy node. Rotate the copy node to make another fracture line. Do this another time to get more cuts.

    Get a mountain noise and then change the amplitude to 0.75 to get more variation along the curves. Then get a null node named FRACTURED_OUT to finish it. 

Fracturing the glass

    Go back to the wine glass geo. Get an object merge and bring in the fractured geo. Now get a Boolean node and plug them both in. You might see some warnings pop up. Change the operation to 'shatter' 'pieces of A'. You can use an exploded view to see how the object has shattered. 
    Create a null node named 'GLASSFractured_OUT'. 
    Go back up to the object level and hit escape. Make sure you only have the wine glass selected then hit rbd convex proxy. It creates approximate convex shapes for the simulation. 

    Make a ground plane, and hit play on your timeline to see the glass fall apart. Go into the autodop network. select the top node under physical change the density to 2000.
    That's all we need to do to set up the basics. Next week we'll start on the fluid sim. 

Tuesday, 18 February 2025

Mosaic Generator in Substance Designer

 Here it is, most of the graph is straight from the Quick Tip Video from Substance 3D video. I've made some changes to it but you can download it from the perforce server in the source assets> textures > substance folder. 


    To the left of all these graphs is a frame with some test images I used. You can also adjust the HSL values and adjust the image with a curve node if needed. Drag and drop your image here and hook it up to the dot node. Your image should now show up in the 3d view. 

    IMPORTANT NOTE: Substance Designer likes images that are square, 2048x2048 is usually fine. Anything imported that is not square may cause it to break. 


    Here you can adjust the levels of the greyscale image. This can affect how the mosaic lines show up. Play around with it to get a result you'd like

Here I have included a way to get color variations on some tiles. It uses a gradient map with a random greyscale map. You can turn this off with the switch node at the end.
 

Friday, 14 February 2025

Houdini Workshop Week 5 - Spring 2025

 Part 2 of our VBD smoke session. 

NOTE: I had an issue where I left the display flag on the solver when i saved and exited the file. When I tried to reopen it it kept wanting to cook and would not respond. To fix this, go to the bottom right where it says Auto Update and turn it to manual (you might have to hit escape a bunch of times here). This will make it so that it only updates when you tell it to. Now you can hit the display flag on the file cache we made last time. 

Making a volume to contain it

burger

    We want to contain the smoke so that its not clipping through the pipe we made. To do this we'll make a bounding box for our volume. Make a time shift node and navigate to the frame with the biggest volume in the viewport. For us it was around 450. Right click on the Frame parameter in the timeshift node > delete channel. We want it to be a static frame, we don't want it to change depending on the timeline. 
    Next make a bound box, renamed to BoundingBox. You don't need to change any parameters here. It will create a polygon box around your volume.
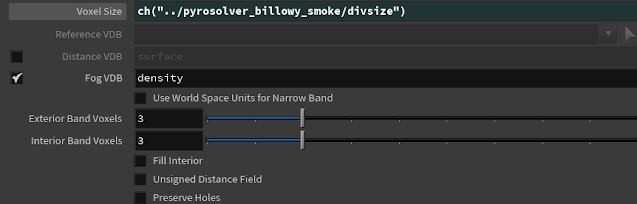
    Then you'll need a vdb from polygons node. We want to make sure that the voxel size is the exact same from our pyrosolver. Go back to the pyrosolver node and find the voxel size parameter. Right click on it and select 'copy parameter'. Then go back to our vdb from polygons node. In that voxel size parameter, right click and hit 'Paste Relative References'. You'll see that it pastes 'ch("../pyrosolver_billowy_smoke/divsize")'. This connects the two parameters, so this vdb from polygons node will update when you update the pyrosolver.
    We also need to change the distance vdb to off and the fog vdb on. 
    Now grab a volume mix node. the first input is our vdb from polygons node, the second input is our original smokestack file cache node. The mix group should be @name = temperature. 
we have a defined volume

Clipping the smoke stack

    Now we want to clip the smoke stack so it doesn't look like its going through the geo. 

    We could use another volume mix with the subtract operation, or a volume VOP (node based network to program VEX). But the best solution we've got is to just use a volume wrangle node and write in VEX. 
Example of the inside of a volume VOP to do this. Its reading the first and second input's density primitive name and then mixing them 
    We do need another extruded tube to block out the shape that we don't want our vdb to go through. Add a vdb from polygon node to turn it into a vdb to subtract with. 

    The tube has a center of -0.7 and 20 columns. The poly extrude has a distance of 6 with output back on. Make sure the vdb is a fog one instead of distance one. Also paste the relative reference of voxel size from the pyrosolver.
    Now in the volume wrangle node, write this: 
density = lerp( volumesample(0,"density", @P), 0, volumesample(1, "density", @P));
    It's just a default lerp from the original volume, to 0, with the new volume we made determining where the 0 should go. 
    Our volume should now no longer clip through it

Making Volumes Loop

    Now we need to loop the smoke sim. This is a bit tricky, but we can do it with some vex code. Create a null node and name it LoopControl. 

Press z to bring up the shape node selections and c to bring up the colors for nodes

    In the parameters, go to the icon next to the name at the top left > Parameters and Channels > Edit Parameter Interface.

    You'll see this window pop up. Drag 5 Integer Type parameters from the left side into the middle 'Existing Parameters'. You can change the name of the variable and the label that shows up in the parameter box in the right box 'Parameter Description. You'll need:
  • Transition Amount
  • Offset Amount
  • Start Transition
  • End Frame
  • Offset Second Cache
    For transition amount and offset amount you can change their default values to 40 and 140 respectively in the channels tab to the right. 
Offset amount default value
    Hit apply and you should see these parameters appear for the null node. 
    We're going to edit the channel expressions for start transition, end frame and offset second cache. Press alt + e to bring up the code editor.
Start Transition: 
ch("./end_frame")-ch("./transition_amount")
End Frame: 
ch("../smokeBake1/f2")-ch("./offset_amount")
Offset Second Cache:
ch("./end_frame")-ch("./offset_amount")

Note that '../' means to go up a level to another node, while './' means within this node. The ch("../smokeBake1/f2") is our original file cache node, and the f2 specifically means the second frame or end frame. 
    Now we need two time shift nodes into a volume mix node.

    In the first time shift node's frame, write: 
$F+ch("../LoopControl/offset_amount")
    In the second time shift node's frame, write: 
$F-ch("../LoopControl/offset_second_cache")
    Then for the volume mix, change the mix method to blend. In the blend parameter,  open up the expression editor (alt+e) and write this: 
if($F<ch("../LoopControl/start_transition"), 
    0,
    if($F>ch("../LoopControl/start_transition") + 
        ch("../LoopControl/transition_amount"),
        1,
        ($F-ch("../LoopControl/start_transition"))/
        ch("../LoopControl/transition_amount")
        ))

what's kinda happening with our blend

    If you've done it correctly, you should be able to change the timeline to 1-360 and watch a seamless loop. 

    For the final nodes, make a convert vdb node, and convert to VDB. 

    Make a final file cache node. For the end frame setting, write: 
ch("../LoopControl/end_frame")
    Save this to Disk. This will take awhile but thats all that needs to be done.

Importing into Unreal

Look into the folder, you'll see a bunch of files were generate them. You only need to drag one of these into the unreal project. It understands it is part of an animated sequence, so long as they're all named the same. 


    For the settings, change the attributes A to 32bit float. The dimensions at the bottom is how big our smoke is going to be. 

    WARNING: this can be memory intensive and can cause Unreal to crash. Close out any other programs to help with importing this.

    Once that's done importing. Go into the content browser, in the engine folder look for sparse volume texture viewer. Drag it into the scene. This is only used to see if we've imported it correctly.


    Change the sparse volume to our looping smoke and make sure that playing and looping is turned on. If you don't see it it might be because it's really small. 
    Now that we know it worked. Look for a SparseVolumeMaterial in the engine folder. Make a copy of it and put it in your content folder. Create a material instance of this. 
    Inside the material instance, change the sparse volume texture to our vdb we exported. 
    Look for heterogenous Volume in the place actors box. Drag and drop it in the scene. Change the material of the volume to our material instance we just made. Also make sure looping and playing is turned on as well. 

        Now the heterogenous volume should show our smoke (although still tiny). Rotate it 90 degrees and scale it up, and it should be done. This material should also allow you to color the smoke however you want for now. 


LIGHTING ISSUES

 To set up to bake lighting:  Project Settings: Engine - Rendering:  Allow Static Lighting to True Disable Lumen: Change global dynamic illu...