Tuesday, 28 January 2025

Lighting Workshop Week 4

 Exposure Values


    In your camera, there is a sensor that takes in the light of your scene. This is used to capture an image. In a DSLR Camera, when you take a picture, you hear a clicking sound. That is the shutter opening and closing in front of the sensor to let light in. High Shutter speed means the shutter is open for less time, while low shutter speed is open for longer. With a Low shutter speed, you get a brighter image because it is open for longer and captures more light. However if an object is moving fast, the object can appear blurry.
    Note: shutter speed can also been known as shutter angle in the film industry.
    Exposure value is how bright you want a picture. You can have multiple combinations of apertures, ISO, and shutter speed values to get that value. 
    You can measure this exposure value for real lights, and apply this value within Unreal. 
Aperture.

In Unreal

    Inside of a basic level, bring in all the basic environment lights and a post process volume set to infinite but keep the auto exposure histogram settings. 
    In the post Process under the exposure tab, you'll see these values. In a scene you might have an interior (like a museum) and an exterior (a bright sunny day). The EV values for both are going to be different, but we can tell Unreal what's the minimum and maximum EV we need.
    Change the min ev100 to 9.5 and the max ev100 to 16. You'll notice that when we change the min ev100 to something higher, the scene turns dark. This is the minimum amount of light that unreal is compensating for and will show you. You'll need to increase the directional light to the correct lux value that the sunlight is at (which is 120,000).
    When you do this the scene will be lit.

    If you go to show> visualize > HDR (eye adaptation), you can see this histogram, along with some text in the center telling you the exact EV100 value.

TIP:

    If you just want to bring up the exposure evenly with a point light, a cheap way with dynamic lights is to:
  • large attenuation radius
  • turn off specular scale
  • turn off use inverse squared falloff and turn down light falloff exponent to near 0 (can't do 0 it won't let you)
  • Also turn off cast shadows
    Now it lights evenly and you won't know where the light is coming from. This works well with lighting trees since it has a lot of self shadowing with the leaves


Monday, 27 January 2025

Lighting Workshop HW3


Used Asset Pack Forest Fungi - Mushroom Pack by Guardians Labs.

References

WIPS


Tech Art Math Part 3

 Changing Coordinate Systems.

    You're modeling in an abstract 3D scene. It's a virtual abstract mathematical scene, that you need to get onto the screen. 

Object Space

    All objects start in objects space, centered around the DCC (digital content creation) origin. 

    What is it good for? Most of the time the OS matrix is just Identity. What about object/joint presets?
    What if you wanted to change the pivot point? You have to create a new object space transformation, usually: 
OS = T * Rz * Ry * Rx * S * I
    It's a matrix that moves the object in object space to be relative to the origin where you want it to be. 
    Sometimes called the Pretransformation (applying a transform right onto the object before you do anything else) Often used to change the pivot point. 
    This is the last place anyone is going to look for a transformation, so its best you don't mess with this too much. 

World Space

    All objects in a scene are collected into World Space, (AKA Scene Space). Every object inside of your scene has been manipulated into world space. 
    A World Transformation Matrix transforms each model in Object Space into a single common World Space

Composition Order for WS
    Rule of thumb: Use Post-Multiply transform order, "Reverse Order". 
    EX: WS = T * Rz * Ry * Rx * S

You can see the world transformation matrix on any geo node in Houdini using worldTransform() function.
Here there's no data on the object, the world transform is still the identity matrix
Now you can see the world transform has been changed after I scaled up Rubberto and moved him around in the scene
    
Here you can see the rotation matrix is also shown in the world transform matrix. 

    If you take the inverse of the world transformation, you can put it back to the world position without any transformation data on it. What's the use of it? Well if you're a vfx artist and want to transforma vfx, you want to do it at the origin, or else the scale is going to throw it off. So you want to transform it back to the origin, perform your operations, and then send it back

View/Camera Space

    Establish which direction is "Up" and which objects are visible in camera. View Matrix Transforms objects to view Space. What really happens is that it remaps the world space so that the camera is at the origin and looks down along the minus-Z axis. This makes the math easier when the camera is moving and rotating in the scene. Now instead of the camera moving, everything else moves around it. 
How to create CS Matrix
Proper Way: CS = inverted(Camera's world space matrix), then multiply everything in the scene against that. 
Hacky Way: (Assuming S > R > T), reverse the order of the negative rotations and translations. 
CS = -CRx * -CRy * -CRz * CT(-x, -y, -z)

Matrix Rendering Transformations

    Projection Space: we need to transform all objects into the 2D Display. All objects needs to be flattened into a 2D plane. 
    Near and Far clipping planes, Field of View and Aspect Ratios need to be take into consideration. 

    The Projection Space is what will be projected into a 2D plane. It is a frustum, with the smaller top being the near clipping plane and the bigger bottom being the far clipping plane.
    Two Types of Projection Space
  • Orthographic Projection: Universe is parallel
    •     This is the Orthographic Matrix
This Matrix works if you've followed the order we've done so far, Post Multiplication of the World Transform, and then multiplied against a point. 
    • This produces a flattened model. Although to our eyes looking through the camara it looks the same

  • Perspective Projection: Universe has perspective
    • The Perspective Matrix:
unsure of why we can use FOV = 180 since tan-1(180/2) approaches infinity. Don't know why yet
  • You can use atan2 for the inverse of tan

Variations

    There are technically 4 different versions, DirectX has Left handed vs Right handed space and Open GL also has Left handed vs Right handed space (so 4 in total)


Don't Forget w

    After the point is multiplied against perspective Matrix, it is still not flat. The Perspective Projection swapped z and w in order to translate to correct z position. Divide each component by w to flatten. The GPU does this for you already. 
    So if done correctly, your z value should end up as 1, and you only have the x and y values left since it's 2D now. 

Friday, 24 January 2025

Houdini Workshop Week 3 - Spring 2025

     We'll be looking at the Legacy Pyro FX today.

    We want to export this out not as a volumetric but as dynamically remeshing object.

    In Houdini create a non animated test geo. We went with the Tommy Test geo.


    You'll want to go to the top right shelf and add a new shelf named "Legacy Pyro FX". It might be hidden in the extra 'shelves' options.

    On this shelf, click the 'Flames' with your geo selected. 


    It'll generate a DOP network and a pyro import geo node. You no longer need the source, and can turn off the autoDopNetwork. Just into the pyro import node. 


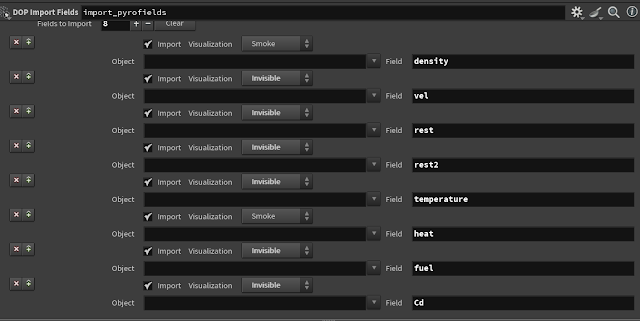
        You'll see these nodes. Click on the import_pyrofields node

    These are what goes into a pyro sim. You can change the 'heat' field to visualization: rainbow to see how it looks.
    Create a delete node.

    In the parameters change the group to '@name= density' and delete non-selected. So we delete everything else. 
    This is VEX code. What it's saying is to get all the objects that are part of the density group. The @ means an attribute, so look for the attribute name.
    Do the same thing to isolate the heat

    Now we're going to bake out this simulation so we're not constantly recalculating the sim. Create a file cache. Check on 'load from disk' option and change the name to FireSource. Save to Disk. The sim should run better now since we'll be loading from the disk (if we change any previous attributes before this node, we'll have to resave it disk). 
    Find two frames about 100 frames apart that look somewhat similar to each other. We'll make a cycle out of this. Drop in a make loops SOP

    When you first look at the parameters for make loop. You'll see that the Start frame and End frame are highlighted as blue. This is because they are connected to the timeline. You can left click on these options to see the VEXpression that is driving this.

    Make another file cache node to save the loop out. 
    Now for the isooffset SOP.

    Output Type should be Iso Surface and the mode should be Volume Sample. We adjusted the offset until we got a mesh that looked like fire but wasn't cut off by the top.
    These polygons are actually inside out. You can tell something isn't right since the faces are dark blue. Hit the D key to show the display options

    Now we need to put a reverse SOP to reverse the normals. It should display normally now. But now we need them as tris. Bring in a Remesh SOP. This turns it into tris.
    Add an attribute blur node to help with smoothing the geo out.

    Now for this sim, the Poly Reduce node doesn't help much, but it does help to know about this. You can use it quickly to make different Level of Detail models (LODs). You can determine the percentage of polys you want to keep or the max amount it should have
Turn on bypass for the poly reduce node so we don't work with it

    Add a Clean sop to help clean up the model. Turn on 'Manifold-Only Topology'

    Add a Normal SOP, group type: points. 
It calculates the normals of the vertex by taking the 3 vectors point to the other vertices this one is pointing to, adds them up together and then divide by 3. (this is an important step, we need this)
    Next, attribute from volume SOP. We need to go back up to the make loop node, drag off of it and input it to the 2nd input of the attribute from volume SOP. If its too far up, drag off of the make loops node, and alt click to make a pin dot to help organize it a bit better. 
    

    Create a final null node for the output.

Exporting

    Create a ROP node, inside the rop node create a labs vertex animation. Take the input geometry as the null node we just made. 

    Change the Lookup table format to HDR (ExR/TIFF as RGB 16/32 in Engine) .exr
Render all.
    Exrs are useful as the cover the entire range of colors possible and stores them in a linear color space. 
    Name it what you want in the export tab and then hit render all. 
    NOTE: This one you'll need to render two passes. One for the lookup table and one for the rotation/position/color exrs. After the first one is finished, change the 'Render Pass' to Second Pass. 

In Unreal

    The import options for the fbx are the same as last times

The only settings you should have on are: 
  • Vertex Color Import Option: Replace
  • Transform Vertex to Absolute: Yes
  •  Normal Import Method: Import Normals and Tangets
  • Convert Scene: Yes
  • Override Full Name: Yes
  • Material Import Method: Do not create Material
  • Reorder material to FBX order: Yes
    If you need mesh lods you can turn it on but we don't need it, so we'll keep it off. 


    When you import the geo, its gonna import as a bunch of floating tris. You'll need to make the material to make it right. 

    Similar to the other houdini materials, turn off tangent space normals, and make 4 custom uvs. Here we've just added two colors with a lerp node. 
    Make a material instance and attach the exrs we rendered out. MAKE SURE you've right clicked on them in the content browser, scripted asset actions> Houdini Config Textures for VATs (HDR).
    Apply to the static mesh and you're done.

Note: this week we didn't entirely get it to a work state. Its a start. We'll have to look into this more.

LIGHTING ISSUES

 To set up to bake lighting:  Project Settings: Engine - Rendering:  Allow Static Lighting to True Disable Lumen: Change global dynamic illu...